The Mira Project Interface provides the most powerful batch-style processing short of using scripts as with the Mira Pro x64 Script interface. A Mira Project automates a sequence of command dialogs using their parameter profiles (or "presets" that maintain a collection of parameters). This provides processing sequences for cases in which the versatility and complexity of scripting is not required. For example, a project might be created to perform automatic image calibration. Simply step through the command sequence for creating and applying calibration steps, adding each command and its parameters as a project step.
A project is created simply by performing the necessary command steps in sequence using the desired parameters. The parameters used by each command in the project must be saved as a profile for the command. For existing projects, the Mira Project Manager may be used to remove specific command steps or modify them by specifying a new profile without having to recreate the project.
A Mira project is intermediate in complexity between using a single command to process an Image Set and using a script through the Mira Scripting Interface. Each command in the project operates exactly as if run stand-alone.
Bulk Processing Options for Images
Images are just one type of data that can be processed by Mira. But for images in particular, the following table shows how the Mira Project Interface fits into the bulk processing options available in Mira:
| Data Source | Operation | Requirements |
| Single Image | One image is processed by one command. | Requires an image displayed on the GUI. |
| Image Set | Multiple images displayed in one Image Window are processed by one command. | Requires an image set displayed on the GUI. |
| Image Set | Multiple images or multiple files are processed by one command. | Uses the dialog's Select Source Images control to access one of more images in a single window or in files; does not require displaying the images. |
| Mira Project | Multiple commands each process an image or image set according to each command's profile settings. | Image and data sources may be displayed or in files, according to the parameter profile used by each command in the project. |
| Script | Arbitrary processing or computation for images or other data that are displayed on the GUI, in files, or created by the script. | The text-based script is created and managed through the Mira Scripting Interface. |
Overview of Mira Projects
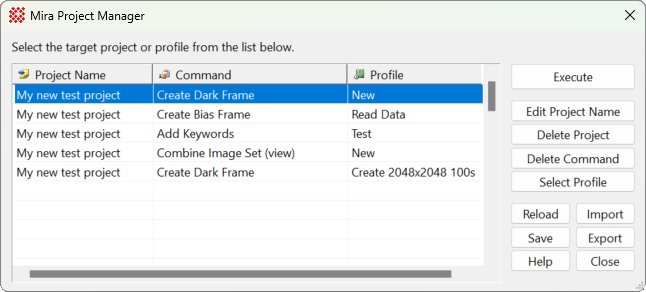
Since a project executes a sequence of dialog-based commands, each of the commands and their parameters must be added to a project and the project must be given a name. This is initially accomplished from each command dialog as you include it in the project using its profile control. Projects can be edited using the Mira Project Manager. The Project Manager can accommodate any number of projects and commands. Only one project is shown in the picture below.
Structure of a Mira Project
Below is a hypothetical example of a Mira Project having 3 steps. Notice that the command in each step shows the label "(view)", meaning that the command operates on images displayed in a view window, in this case, an Image Window. This means that the target window containing the image or image set must be top-most when the project is executed from the Mira Project Manager. If a command returns a failure code, the project terminates before finishing. Failure may result from processing the data or if the parameter profile does not exist.
Here is a possible sequence for a hypothetical project that starts from an Image Window containing the target images:
- Step 1: Command: Image Arithmetic (view) Profile: Add second image
- Step 2: Command: Value Arithmetic (view) Profile: Add offset value
- Step 3: Command: Gaussian Filter (view) Profile: Smooth 10x10
Remember that the project above shows only "(view)" type commands and requires an Image window to be top-most when it executes. This project could also use global commands which do not require the images to be displayed at the time the script is executed. For example, you might open the global Create Synthetic Image command from the main toolbar and add the following step to the same project:
- Step 4: Command: Create Synthetic Image (global) Profile: 4096 square image
Commands Available to Projects
Each step in a Mira Project is added from a Command Dialog that uses a Profile Control to save its parameters. Command dialogs exist in several forms, depending on the type of data they use, as described in the Command Dialogs topic. Currently, 133 command dialogs are available to projects:
- Immediate Command Dialogs process images displayed in an Image Window. In the project, their command name is tagged with the word "view."
- Global Command Dialogs process data, usually images, from files. In the project, their command name is tagged with the word "global."
- Some global command dialogs do not process data from either an Image Window or a file. In the project, their command name is also tagged with the word "global."
Creating a Project
First, decide whether the project will start with images displayed in an Image Window. If so, open one or more images into an Image Window and make it top-most window to enable the image window menu with its immediate mode command dialogs. If the project will process only images in files, you do not need to display an image.
A project is created or extended by opening each command dialog in turn as you step through your processing sequence. To add a command to a project, do the following:
- Open the command you wish to add to the project.
- Use the displayed profile or use the profile history list to open an existing profile or set parameters and save as a new profile.
- Click the Profile Control button to open its menu. Select the Add to Project command from the menu.
- The Mira Project Selector opens, showing the current project in the text field.
- To select the project displayed in the text field, click [OK].
- To append to an existing project, select it from the list and click [OK] .
- To create a new project, enter its name into the text field and click [+] . Then click [OK].
- Close the command dialog.
- Open the next command dialog and repeat steps 2 through 5.
Note that immediate mode command dialogs can only process images displayed in an image window (a "view" window), and starting from a view window is the only way to add (view) type commands to a project. However, a project can mix both immediate mode and global mode commands. A project that includes immediate mode "(view)" commands must be executed after an Image Window containing the sources images is made top-most. If the view window is not top-most, a project containing "view" commands will abort with an error.