Script Editor
To create and edit scripts, Mira integrates a Script Editor derived from the Scintilla Source Editing Component. This editor provides context highlighting as well as full editor functionality such as cut/copy/paste, line numbering, formatting, etc. Context highlighting uses different formatting such as fonts and color, to display different aspects of the script syntax.
The Script Editor also can execute the displayed script, with one important exception. To execute an open script, you can click the [ ! ] button on its local toolbar, use the equivalent button on Mira's Main Toolbar, or use the Script Manager. However, there is one significant difference between the [ ! ] buttons on the two toolbars: Scripts that access the top-most image window using the CImageView:Attach method do not work when executed from the [ ! ] button on the Script Editor. The reason for this lies in the issue of which window is the top-most window. When you click [ ! ] on the Script Editor, then the Script Editor window—and not the target image window—is the top-most window, hence the target image window cannot be attached by the script. Scripts using the CImageView:Attach method must be executed either from [ ! ] on the Main Toolbar or from the Script Manager (with the target image window being the top-most window). Scripts that do not use CImageView:Attach may be executed using any of the 3 methods.
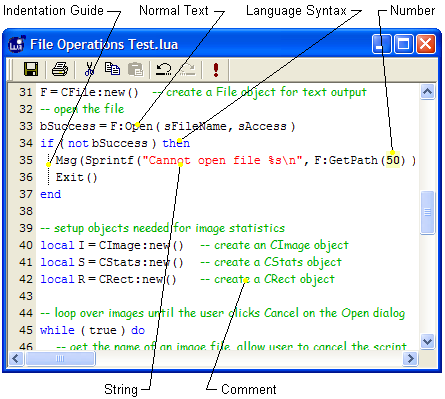
The picture below shows a typical script displayed in the Script Editor. In this script you can see various elements of the Lua language and Scintilla formatting styles available in Mira. The various format styles are labeled. These are the default settings for the Pro Script module, but you can alter them at any time.
The toolbar on the top margin of the Script Editor
has buttons for common actions, including ![]() for executing the script. The toolbar buttons
are otherwise standard buttons for Windows software, and they have
their usual functions.
for executing the script. The toolbar buttons
are otherwise standard buttons for Windows software, and they have
their usual functions.
|
Note |
To run the script using data in the top-most window,
use the |
When the Script Editor is the active document window in Mira , it loads its own menu bar containing relevant commands. Many of the commands in these menus are are common to all text editors, such as cut, copy, and paste commands. Other features are described in the following table.
|
View Menu Commands |
|
|
Word Wrap |
Check this option to wrap long lines to the right Editor margin. |
|
Line Numbers |
Check this option to show line numbers in the gray margin on the left edge of the Editor window. |
|
Bookmark Margin |
Check this option to show bookmarks in a gray book mark margin on the left edge of the window. This margin is different from the Line Number margin. |
|
Folding Margin |
Check this option to show a Text Folding margin on
the left edge of the Editor window. This margin shows a special
symbol that you can click to toggle between folded text and normal
text.Folding allows you to show only
the beginning of block structures such as |
|
Initialize Styles |
Click this command to reset to default values all syntax styles (see topic below). This is normally useful only if you have changed all the syntax styles in a way that makes the script unreadable. After initializing the styles you will need to recreate your special styles as described below. |
|
Toolbar |
Click this command to toggle the Script Editor Toolbar on and off. |
|
Preferences |
Opens the Mira Preferences dialog. |
|
|
|
The elements of a script include regular text for function calls, values, etc., as well as keywords of the Lua language, comments, and strings. Each of these syntax components may be highlighted to make it easier to distinguish from the other components. The Script Editor processes each character you enter and formats it accordingly if it matches one of the syntax rules. For example, when one dash, -, is typed, it appears as regular text. But typing a second dash to make '--' begins a comment, which is immediately highlighted in the comment style. The default for comments uses the Comic Sans font in italic form as shown above. The default settings shown above are described in the table below.
|
Default Syntax Highlighting |
|
|
Language keywords |
Arial font, blue, normal weight. |
|
Normal Text |
Arial font, black, normal weight. |
|
Numbers |
Same font as Normal Text, bold, yellow background. |
|
Strings |
Arial font, red, normal weight. |
|
Comments |
Comic Sans font, green, normal weight. |
|
|
|
Move the Editor caret (its cursor) onto an example of the syntax element you want to change. You can do this using the mouse or arrow keys.
Right click inside the editor window to open its Context Menu.
In the central section of the context menu, under Set Current Style:, click on Font, Color, or Background to change that element. The change will appear immediately in this Editor window.
Changes you make are saved and will also apply to all future Script Editor windows.
To print a script, use the standard method of
File > Print or the ![]() button.
Scripts print in the normal way you print other text from any
Windows application software. However, there are two very useful
options in the View menu that are described in the following
table.
button.
Scripts print in the normal way you print other text from any
Windows application software. However, there are two very useful
options in the View menu that are described in the following
table.
|
Script Printing Options |
|
|
Print Syntax Styles |
This option controls how your font and color styles will print:
If checked and you print on a non-color printer, the syntax coloring is converted to gray shades. |
|
Print Wrapped Lines |
This option controls how long lines are handled by the printer:
This setting does not affect the view in the Script Editor window. |
|
|
|