
Calculate Gain
The Calculate Gain command measures the inverse electronic gain of a digital camera. The gain is expressed in terms of either electrons per Analog to Digital Unit (ADU) or Digital Number (DN), as "e-/ADU". Detailed results of the calculation may be listed in the Message Pane.
The Calculate Gain command opens from the Measure > Diagnostics menu when an image set is displayed in the top-most window.
Properties of the Calculate Gain Properties
|
Flat 1 |
Select the first flat frame image from the Image Set. |
|
Flat 2 |
Select the second flat frame image from the Image Set. |
|
Bias 1 |
Select the first Bias frame image from the Image Set. |
|
Bias 2 |
Select the second Bias frame image from the Image Set. |
|
|
Check this box to calculate the gain using only the region of interest defined by the Image Cursor Otherwise, the entire image is used. |
|
|
Click this button to calculate the gain. |
|
[List Summary] |
Click this button to lists a summary of results in the Main Messages Pane. |
Best results are obtained if the Bias frames are taken sequentially and the flat frames are taken sequentially and exposed to the same illumination. As a by-product of the gain calculation, this command also reports the readout noise (or fundamentally base level of noise) produced by the camera.
Making this measurement requires opening 2 Bias frames and 2 flat frames (4 images) as an Image Set. The image set may have more images but you must select these 4 images from the set.
Open anImage Set containing 2 Bias frames and 2 flat field frames. Make this the top-most window.
Click the Measure > Diagnostics > Calculate Gain command to open thedialog.
Using the 4 image selection controls, select the 2 Bias frames and 2 flat field frames from among the listed images.
Using the ![]() Use Cursor ROI option, choose whether to use
the entire image for making the measurement or to limit the
measurement to a region of "good" pixels. This is a statistical
measurement and you do not want blank pixels or image defects
affecting the statistics. Repeatable hot pixels or dead pixels in
the Bias frame, and flat field irregularities such as "dust donuts"
have no significant impact on the measurement.
Use Cursor ROI option, choose whether to use
the entire image for making the measurement or to limit the
measurement to a region of "good" pixels. This is a statistical
measurement and you do not want blank pixels or image defects
affecting the statistics. Repeatable hot pixels or dead pixels in
the Bias frame, and flat field irregularities such as "dust donuts"
have no significant impact on the measurement.
Click ![]() to perform the
calculation.
to perform the
calculation.
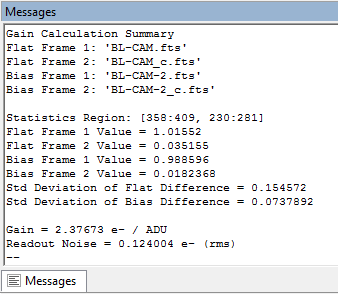
To view details of the measurements and the calculation, click [List Summary].
The picture below shows typical output in the Message Pane after clicking [List Summary]::
Mira Pro x64 User's Guide, Copyright Ⓒ 2023 Mirametrics, Inc. All
Rights Reserved.