To open the Calibration Results page,
click ![]() on the Aperture Photometry toolbar
and select the Calibration tab. This dialog is resizeable to
show more or less of the calibration table.
on the Aperture Photometry toolbar
and select the Calibration tab. This dialog is resizeable to
show more or less of the calibration table.
Calibration Results (Photometry)
The Calibration Results page is a member of the Aperture Photometry Properties dialog. Items in the table are used for calculating the photometric zero point, which calibrates the measurements to an instrumental system. They are calculated as a result of the photometric zero point calibration.
To open the Calibration Results page,
click ![]() on the Aperture Photometry toolbar
and select the Calibration tab. This dialog is resizeable to
show more or less of the calibration table.
on the Aperture Photometry toolbar
and select the Calibration tab. This dialog is resizeable to
show more or less of the calibration table.

|
Photometric Calibration Properties |
|
|
Image |
The name of the image. |
|
Zero Pt |
The photometric zero point used for the image. The value listed is the one currently used, which may originate in 3 ways: 1. Initially, the value is taken from the ZERO-PT keyword in the image header. 2. If Mira calculates a new zero point, then that value is listed. 3. You can force a specific zero point value for the image. To do this, simply type a new value into the table and click [Apply]. |
|
Error |
The standard deviation of the calculated zero point for the image. the header keyword for this quantity is ZEROPERR. |
|
# Stds |
The number of standard stars used in calculating the zero point for this image. The header keyword for this quantity is PHOTNSTD. |
The table columns can be resized by dragging the vertical separator bars between the column headings. To see more data outside the window, use the scrollbars.
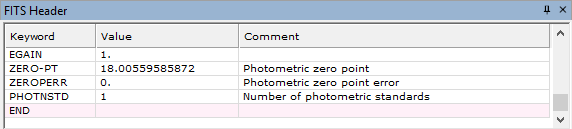
The information shown in the Calibration table is added to the headers of the images. This information is saved permanently to the image files only if you save the image(s) in the standard way. These keywords are added to the header as shown below.
Changing values in the calibration table is simply a matter of clicking on a cell and typing new numbers into the target cell. Additional tools are provided in a pop-up menu that is opened by right-clicking on the table. The menu provides the ability to copy or save data from the table. In addition, if working with an image set, the calibration menu provides tools for copying specific cells to other cells of the table.
|
Note |
The particular commands available in the menu depend upon whether a single image or an image set is being measured and whether a single cell or a range of cells is selected. |
The example below shows how to copy cell contents to other cells of the table. In this example, we wish to copy the zero point value from the top row (first image) to the 5 images following. To do this, the table must have the Selection Mode set to "Multiple" or "Row" (do this using the Selection Mode command in the Grid Context Menu).

Click on the cell(s) in the row you wish to copy.
Drag the mouse to the final cell to highlight a copying range. You may also click on the first cell of the range, then use the standard Windows protocol of holding down the[Shift] key and clicking on the last cell of the range.
Right-click on the table to open the pop-up menu.
In the menu, click the mouse on the Fill... command you wish to use. Fill down and Fill up duplicate only those cells that are selected. Fill top row down copies the entire top row except for the image name.
To update the values to the images, click [Apply].
Changed table values are not saved permanently to the image files unless you save the images using one of the standard saving methods.
Aperture Photometry Properties
Mira Pro x64 User's Guide, Copyright Ⓒ 2023 Mirametrics, Inc. All
Rights Reserved.