![]() Distance
and Angle
Distance
and Angle
The Distance & Angle measurement tool is
used to measure the distance between two points and the angle of
the line connecting them. The results are reported in the
Distance Measurement Pane . This command opens and closes
using the ![]() button on the Image Measurements
Toolbar or the Measure > Distance &
Angle Toolbar command in the main menu.
button on the Image Measurements
Toolbar or the Measure > Distance &
Angle Toolbar command in the main menu.
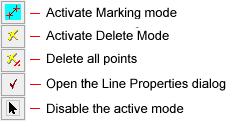
click Distance & Angle in the Measure
menu with Marking Mode (top button) active. Marker properties
are set in the Marker Properties dialog opened from the ![]() button on the Distance &
Angle toolbar.
button on the Distance &
Angle toolbar.
To activate a Distance and Angle
measurement, click ![]() on the Image Measurements
Toolbar or click Distance & Angle in the Measure
menu.
on the Image Measurements
Toolbar or click Distance & Angle in the Measure
menu.
This command creates a Report Window or docking pane like the following:

Adjust the image to the desired scale, showing the region to measure.
Click the ![]() button
on the Image Measurements Toolbar or use the Measure > Distance and Angle Toolbar menu
command to open the toolbar. Marking mode is automatically enabled
when the toolbar is first opened. To reactivate Marking Mode
it, click
button
on the Image Measurements Toolbar or use the Measure > Distance and Angle Toolbar menu
command to open the toolbar. Marking mode is automatically enabled
when the toolbar is first opened. To reactivate Marking Mode
it, click ![]() at the top of the
toolbar.
at the top of the
toolbar.
Move the mouse to the starting point. Press and hold down the left mouse button.
To draw a line only in multiples of 45 degrees, press the SHIFT key and hold it before starting to draw. Do not release the SHIFT key until after releasing the mouse button at the end of the line.
If Centroid First Point is checked in the Marker Properties dialog, the position will lock onto the local centroid near where the mouse is released.
With the left button down, drag the mouse pointer to the endpoint and release the button.
If Centroid Last Point is checked in the Marker Properties dialog, the position will lock onto the local centroid near where the mouse is released.
The results are reported in the Distance and Angle measurement docking pane or window.
To measure other lines, repeat steps 3 and 4.
When finished drawing lines, you can disable
marking mode by clicking ![]() on the toolbar.
on the toolbar.
If the image has a World Coordinate System calibration, then distance is measured in arcseconds and the angle in degrees is reported as a Position Angle (PA). Position angle is measured with 0 aligned North, with increasing angle measured through east (with increasing right ascension). See Angle Measurement Definition.
If the image has no WCS calibration, the distance is measured in pixel units and the angle in degrees is measured in the trigonometric sense: An angle of 0 degrees points in the direction of increasing x (parallel to the rows, pointing toward increasing column number). Positive angle increase through increasing Y (parallel to the columns, pointing toward increasing row number). Different image formats are displayed differently, which makes the angle as you see it, measure differently. A FITS format image is required by the FITS standard to be displayed in the traditional Cartesian sense with x to the right and Y upward. Therefore, angle is measured with 0 degrees pointing right and 90 degrees pointing upward.
Measurements are tabulated in a Report Window designed specifically for this command. Using this window, the measurements may be sorted, rearranged, saved to the clipboard or a file, etc.
If the image has a World Coordinate System ("WCS") calibration, then X1, X2, Y1, and Y2 give the WCS values corresponding to listed column,row coordinates.
Measurements for all objects in all images and all Image Windows go into a single Report window. If you want to clear the window of prior measurements, make sure the Report window has focus, then use the View > Clear menu command.
The items in the Report window are described in the table below.
Distance & Angle Measurements
|
# |
The sequence number of the measurement. |
|
Image |
The name of the image that was measured |
|
Distance |
The distance in pixel units, or arcseconds if the image has a WCS calibration. |
|
Angle |
The angle in degrees, or a Position Angle if the image has a WCS calibration. |
|
X1 |
The X coordinate of the starting point. |
|
Y1 |
The Y coordinate of the starting point. |
|
X2 |
The X coordinate of the ending point. |
|
Y2 |
The Y coordinate of the ending point. |
|
Col 1 |
The column coordinate of the starting point. |
|
Row 1 |
The row coordinate of the starting point. |
|
Col 2 |
The column coordinate of the ending point. |
|
Row 2 |
The row coordinate of the ending point. |
As with other interactive marking commands, the
Distance & Angle command can use the exact marked endpoints or
it can compute either or both of the endpoints as a precise
centroid position. All 4 combinations of centroid or no centroid
and starting point or ending point are possible. To set this
option, click ![]() on the toolbar to open the
Marker
Properties dialog for this command, then select the
Centroid page.
on the toolbar to open the
Marker
Properties dialog for this command, then select the
Centroid page.
Examples of Distance & Angle Measurement clarifies the effect of centroiding the starting and ending points of the measurement. In the examples, the same starting and ending points were located with the mouse but some of them were automatically centroided by Mira.
Sub Pixel Coordinate Definition
Mira Pro x64 User's Guide, Copyright Ⓒ 2023 Mirametrics, Inc. All
Rights Reserved.