The File Event Scripting control dialog shown centered on the Mira desktop.
File Event Scripting
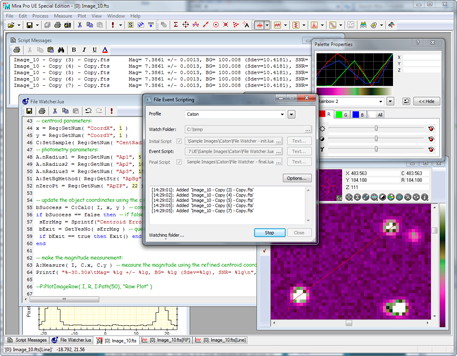
File Event Scripting is a powerful tool used for running real time, script-driven processing of data files. Applications for file event scripting include such varied tasks as immediate processing or analysis of an image acquired by a camera, immediate measurement of a data file, or synoptic astronomical work such as monitoring variable stars or changes in atmospheric transparency. This feature involves using a control window that continually monitors a folder for file changes, then executes a Mira script when triggered by a specified type of file event. The event can be the addition, deletion, or renaming of a file. A control dialog manages the event scripting task while running in a parallel execution thread; this allows you to continue using Mira for other activities while file events are being monitored and handled. See the Tutorial for an example.
|
|
|
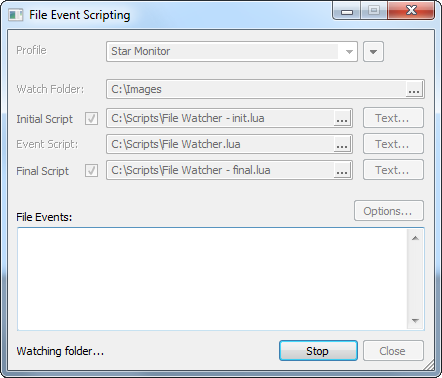
The File Event Scripting control dialog shown centered on the Mira desktop. |
The script executed upon detection of a file event may do anything a Mira script may do but, usually, the script processes the file that triggered the event. Trigger events typically involve the appearance of a file in a folder. For example, if a camera acquires an image, then Mira could run a calibration and measurement script on the image when the image file is saved into the watched folder.
Open this task from the File Event Scripting command in the Process menu or by clicking the ![]() button on the main toolbar.
button on the main toolbar.
It is strongly advised that you do the Tutorial to fully understand the use and potential power of this advanced feature.
Event scripting is a process in which a Mira script is triggered for execution by a file event. A file event is defined as a change in any file inside a continuously monitored (or "watched") folder. The complete process goes as follows:
1. Set Properties in the File Event Scripting dialog.
2. Click the Start button to begin. The dialog disables controls to prohibit changes. Then:
Initial Script called (optional). Also, optional Text may be passed to set Properties.
Event Script called on a file event. Optional Text may be passed to set Properties.
Event Script called on a file event. Optional Text may be passed to set Properties.
Event Script called on a file event. Optional Text may be passed to set Properties.
... (until halted by user)
3. Click the Stop button to halt event monitoring.
Final Script called (optional). Also, optional Text may be passed to set Properties.
4. Event Scripting dialog is returned to idle state with Start and other dialog controls enabled.
The optional initial and final scripts are selected by checking the Initial Script and Final Script check boxes.
The File Event Scripting dialog is the master control center for event scripting. The dialog has different appearances depending on whether it is active or inactive, as shown in the 2 pictures below. The dialog can be resized to expand the text fields.
|
|
File Event Scripting dialog when idle (not watching a folder). Notice that all controls are enabled for setting Properties and starting a process. The message at lower left says "Idle" to indicate that no folder is being watched. Clicking the Start button starts the file watching process. Scripts are selected from a script file using the edit boxes. The Text buttons open dialogs where you enter additional text values used by your initial script, event script, or final script. |
|
|
File Event Scripting dialog when active (watching a folder). Notice that all controls are disabled except for the Stop button. The File Events box lists each file as it is processed. The status message below the File Events box shows "Watching folder...", which indicates that processing is active. Only the Stop button can be used. |
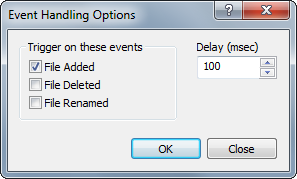
Clicking the Options button opens the Event Handling Dialog where you indicate the trigger for executing your event script:
|
|
The file event is selected from the left hand trio of options. For example, to trigger when a file appears, check the File Added box. The Delay (sec) box sets a millisecond delay between the time the file is detected and the event script is triggered. Use a delay to assure that Windows has released the file for processing by your script. |
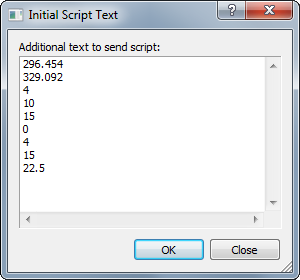
As mentioned above, there are 3 possible script types: Initial, Event, and Final. Each script type may be sent Properties in the form of text values; these values may be entered by clicking the Text... button next to each script type. The following example shows value to be sent to the Initial script:
Mira Pro x64 User's Guide, Copyright Ⓒ 2023 Mirametrics, Inc. All
Rights Reserved.