To open the Point Markers page, click
![]() on the Aperture Photometry toolbar and select
the Points tab.
on the Aperture Photometry toolbar and select
the Points tab.
Point Markers (Photometry)
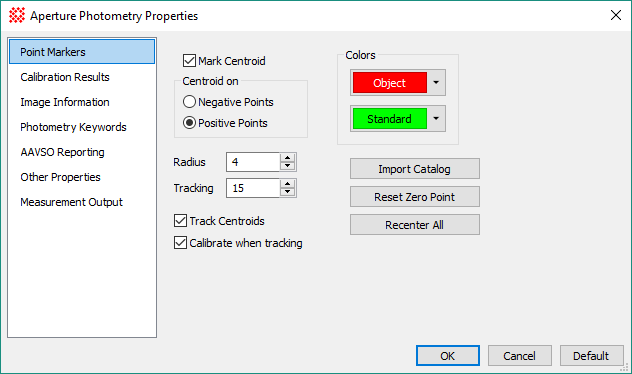
The Point Markers page is a member of the Aperture Photometry Properties dialog. Use this page to configure the marker placement and properties for objects being measured.
To open the Point Markers page, click
![]() on the Aperture Photometry toolbar and select
the Points tab.
on the Aperture Photometry toolbar and select
the Points tab.
|
Point Marker Properties |
|
|
|
Choose whether to locate the objects at a refined centroid position rather than the exact point where you click. |
|
|
If marking the centroid position, the centroid is computed under the assumption that objects have positive brightness above the background level. |
|
|
If marking the centroid position, the centroid is computed under the assumption that objects have negative brightness below the background level. |
|
Radius |
Defines the distance from the target point within which pixel data are used to compute the centroid position. A reasonable starting point for choosing a value is 2 times the FWHM. (Note: FWHM measures a diameter and this parameter is a radius). |
|
Tracking |
Defines the maximum distance from the current position that Mira will search in the next image to lock onto a new position. This is only used when tracking objects through an Image Set. |
|
|
Check this option to calculate the centroid position for each marker in each image. |
|
|
Instructs Mira to compute and apply the zero point to all objects when tracking through an image set. This is a time saving feature that makes it unnecessary to follow Tracking by Calibration as a separate step. |
|
Object Color |
Selects the color used for object markers. |
|
Standard Color |
Selects the color used for standard star markers. |
|
Import Catalog |
Imports and processes a catalog containing coordinate and photometric data from a text file as an alternative to marking points manually. See the Import Photometry Catalog tool. |
|
Reset Zero Point |
Resets the photometric zero point value. |
|
Recenter All |
Re centers the marked objects, usually done after changing the marker centroid properties (see above). |
|
|
Check this box to report photometry measurements in a private docking pane of the Image Window containing the aperture photometry process. Uncheck this box to report measurements in a top level Report Window. If you want to merge photometry results from different windows into a single report, uncheck the box. |
Centroid positions are computed using image data, not the screen display. Choose Positivepoints or Negative points based upon the type of object to measure rather than the palette or other image display properties. For modern, inherently digital images, you will almost always choose Positivepoints. However, when working with a scanned photograph you may find that stars are negative deviations from the background, so you would choose to centroid on NegativePoints.
The Import Catalog button uses the Import Photometry Catalog tool to load new object coordinates into the aperture photometry session.
Set the Properties as desired, then accept the changes by clicking [Apply].
Aperture Photometry Properties
Mira Pro x64 User's Guide, Copyright Ⓒ 2023 Mirametrics, Inc. All
Rights Reserved.