Tutorial: Introduction to Image Registration
This tutorial shows you how to register a set of images. If the alignment involves correcting a simple field drift or a wobble, then you can align them using a single reference point, such as a star. However, in this example we will need the full power of the Image Registration command because one of the images has a serious parallelogram distortion.
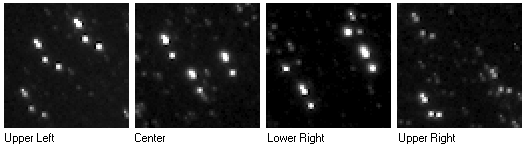
In this exercise we will use 4 images that are distorted relative to each other. The pictures below show the images combined into a single image using the Mean method (a simple average). Each picture shows features from all 4 images together to illustrate the misalignment at various places around the field of view. Within each picture, each group of 4 points shows the geometric relationship between the 4 images. It is clear that what works to align the images at one location does not work at another location. No simple combination of shifting, scaling, and rotation can bring the images into alignment.
To register this set of images requires using a 6-coefficient Shear transformation, which requires using at least 3 reference points per image. But relax! Even though this sounds complicated, Mira handles most of the details behind the scenes. You simply click some points on one image, let Mira copy them to the other images, and click two other buttons to calculate and apply the corrections. The Shear method corrects for image shift, field rotation, non-perpendicular axes, and unequal directional image scale. As you will see at the end of this tutorial, that is sufficient to correct the images so that features overlap with positional uncertainties near the 0.01 pixel level.
To begin, we need to open 4 images of Comet Hyakutake that are supplied with the Mira installation. These were acquired using a CCD camera with a 105 mm lens, which makes them severely undersampled with an image scale of 48 arcseconds per pixel. As you can see, point sources (stars) are typically 1 or 2 pixels wide.
Use the File > Open command or Ctrl+O to open the Open dialog, then select the 4 images as shown. Be sure that the Options box shows Open as Image Set so that the images open into the same window.
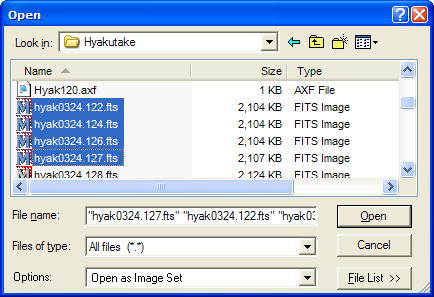
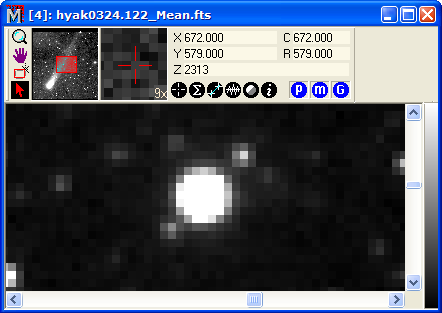
On the Open dialog, click [Open] and the images quickly appear in an Image Window as shown below.
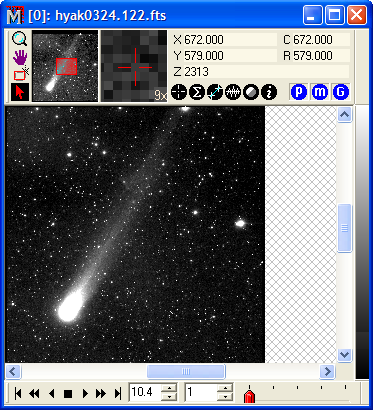
As shown here, we have de-magnified the image and shrunk the window to keep the pictures small. You may choose to use a large window with a magnified image or to shrink the image or window. The display has no effect on the registration quality since the reference markers use coordinates computed from the image pixel data, not from the display.
Before starting to register the images, it is a good idea first to examine the images you have opened. Perhaps some images are poor quality or you have other reasons not to align them. You need to do any image set adding, deleting, or re-ordering before starting Image Registration (or Photometry) since these adjustments are not allowed while the image registration package is active. To examine the images, move the red thumb on the trackbar in the Animation Bar at the bottom of the Image Window. If you need to change the images in the image set, see Changing the Image Set.
After making any necessary changes to the image set, we are ready to register the images. From the Image Window menu bar, select the Process > Alignment > Image Registration command. This opens the Image Registration Toolbar (see Image Registration ), as shown below (note: the Register command is also available as the left-most button on the Animation Bar). When you are finished with the image registration task, close the Registration Toolbar by re-using the Process > Alignment > Image Registration command that opened the toolbar. You can also close the Image Registration Toolbar by clicking the left-most button ("Register") on the Animation Bar.
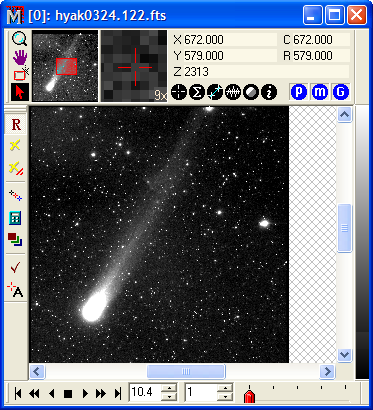
Image registration involves many complex mathematical operations that can be applied in different ways for different situations. This means that many different settings are involved in getting the best results. Typically, you will use the same settings so you will not need to change them each time you do registration. However, you should have a sense of what adjustments and settings are available and how they affect the results. Since this is your first time doing image registration, we will describe these settings in detail, even though you will most often just allow them to operate silently, behind the "front end" of the simple toolbar user interface.
On the Image Registration Toolbar, click ![]() to open the Marker Properties dialog. This is a standard
dialog for setting "marker Properties" used by numerous Mira
commands. This dialog contains the two pages shown below.
to open the Marker Properties dialog. This is a standard
dialog for setting "marker Properties" used by numerous Mira
commands. This dialog contains the two pages shown below.
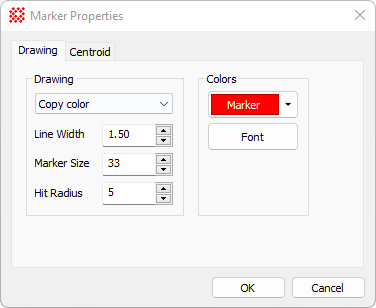
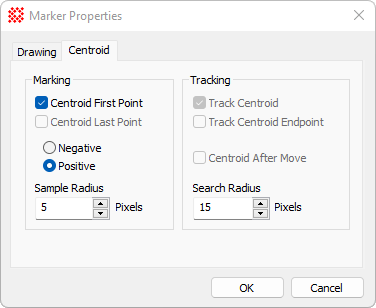
The pictures above show the Drawing and Centroid pages that control how registration markers are located and displayed on the images. The Drawing page shows that the markers are red and 1.5 points (about 2 screen pixels) wide. The Centroid page settings are more important because they are somewhat sensitive to the size of the alignment points on the images. These settings may change for different image sets. In this case, the images are severely undersampled and the stars are only 1 to 2 pixels wide. We use a small centroid Sample Radius of 3 pixels. The tracking Search Radius should be 20 to allow for 20 pixel jumps between images. You should seldom use a value larger than around 40. In addition, these are positive images with brighter things having higher signal, so the centroiding should be done on Positive objects, not Negative ones. You should be using the centroid positions near where you click the mouse on the image. You do not have to use centroiding; instead Mira can use the exact coordinate where you click the mouse. But the Centroid First Point box must be checked if you intend to use centroid positions. When you are finished changing the settings, click [OK] or [Apply] to save your changes.
Next we need to check the method used to align the
images. Click the ![]() button on the Registration
Toolbar to open the Image Registration Properties dialog. This
dialog has 2 pages, as shown below.
button on the Registration
Toolbar to open the Image Registration Properties dialog. This
dialog has 2 pages, as shown below.
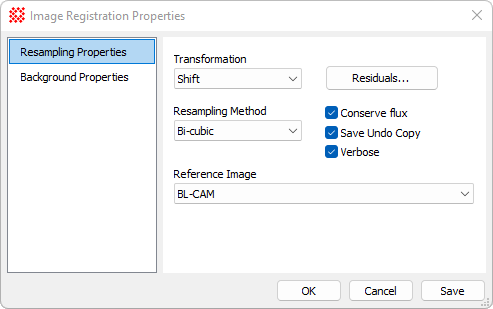
Settings in the Image Registration Properties dialog control the way image pixels are aligned and how the pixel values are adjusted to fall at new coordinates in the output images.
Settings on the Resampling page relate to "resampling", which is the mathematical prescription for how the pixel values are shifted and adjusted to align the images.
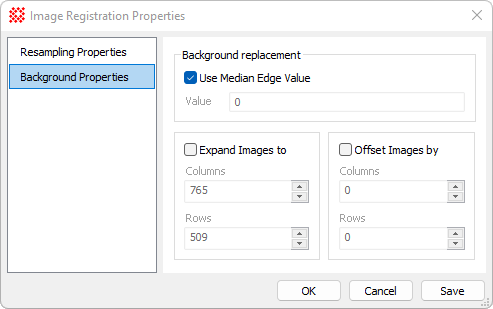
Settings on the Background page control the "background" (or empty image) into which the resampled images are saved. For example, you can choose to make the registered images larger than the original ones or have all the aligned images offset as a group.
For the purposes of this tutorial, make all settings like those shown above. After making changes, click [OK] or [Apply] to save the calibration and close the dialog. We are now ready to mark registration points.
Enter marking mode by clicking the ![]() button on the Registration Toolbar and use the
Animation Bar to go to the first image. Now click on
each of the 6 stars shown in the picture below. As you move onto
each point, notice how the magnified view on the Image Bar shows you a
detailed view, despite the lack of detail in the de-magnified
image. You can adjust the tracker magnification by double-clicking
on it to cycle between 1, 3, 5, and other factors of the original
image.
button on the Registration Toolbar and use the
Animation Bar to go to the first image. Now click on
each of the 6 stars shown in the picture below. As you move onto
each point, notice how the magnified view on the Image Bar shows you a
detailed view, despite the lack of detail in the de-magnified
image. You can adjust the tracker magnification by double-clicking
on it to cycle between 1, 3, 5, and other factors of the original
image.

Seldom do you ever need more than 5 to 6 reference points on a CCD image. So long as the markers are well separated and placed all around the image, the alignment should be excellent. But you must choose "good" points. The points we have marked were chosen using these guidelines:
bright, but not saturated.
fairly round.
well isolated from nearby stars.
distributed around the image, rather than clumped in one area.
At any time when marking points, you can change
your mind about using a point. For example, you can delete a point
and re-mark it elsewhere, or just delete it. To delete a point,
press the [Shift] key and click on
it. In Marking Mode, the [Shift] key is a toggle in marking mode:
up=mark, down=delete), or you can click the ![]() button on the Registration Toolbar to enter
Delete mode. Using the [Shift] key is usually easiest.
button on the Registration Toolbar to enter
Delete mode. Using the [Shift] key is usually easiest.
With 6 points marked on the first image, we now need to transfer them to the other images. There are 2 ways to do this:
Change to the next image and click on all the same objects, repeating this for each image in the stack. This requires knowing or remembering which ones you chose, and perhaps flipping back and forth between images. However, it will be necessary if the images are misaligned in rotation.
If each successive image is within 10 to 20 pixels of alignment with the previous one, Mira can track the points through the remaining images. Tracking computes a new centroid position in each image based on its location in the previous image.
The Tracking method is best if the images are not
far out of alignment. To track the objects marked in the current
image, click the ![]() button on the Registration
Toolbar. There are now reference points in all images, but how well
matched are they? The only way to answer this is to look through
the image set. Using the Animation Bar, step
through each image and check if it found the correct point in all
images. Actually, in this crowded field of undersampled stars, you
will find that some of the markers locked onto the wrong star which
is nearby the correct one. This is easily fixed! In Marking mode,
click on the correct point to mark it, then press [Shift] and click
on the misplaced marker to delete it. Repeat this for any
incorrectly placed markers that you find. When you have scanned
through all the markers on all images, you are ready to compute the
mathematical equations that will be used to shift the pixels around
and bring the images into alignment.
button on the Registration
Toolbar. There are now reference points in all images, but how well
matched are they? The only way to answer this is to look through
the image set. Using the Animation Bar, step
through each image and check if it found the correct point in all
images. Actually, in this crowded field of undersampled stars, you
will find that some of the markers locked onto the wrong star which
is nearby the correct one. This is easily fixed! In Marking mode,
click on the correct point to mark it, then press [Shift] and click
on the misplaced marker to delete it. Repeat this for any
incorrectly placed markers that you find. When you have scanned
through all the markers on all images, you are ready to compute the
mathematical equations that will be used to shift the pixels around
and bring the images into alignment.
To compute the registration equations, click
![]() on the Registration Toolbar. This matches all
the patterns of markers to figure out which marker goes with which
one in all other images and then calculated the coefficients of the
equations that match them. This produces a listing of results in a
Text Editor window:
on the Registration Toolbar. This matches all
the patterns of markers to figure out which marker goes with which
one in all other images and then calculated the coefficients of the
equations that match them. This produces a listing of results in a
Text Editor window:
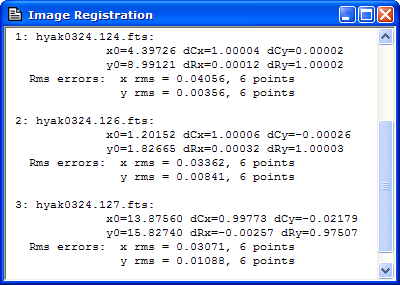
The "Reference Image" chosen on the Resampling page is considered to be perfect
and the other images are matched to it (by default, the reference
image is the first image). For each of the other images Mira
reports "x terms" and "y terms" plus RMS errors. For example, the x
terms are x0, dCx, and dCy and the RMS error in the x axis is
labeled x rms. Since the registration is optimal but not exact,
there will be a small difference between the position of same
detail in a pair of images. In this case, the RMS errors are
typically around 0.02 to 0.03 pixels. That's extremely good! If any
of the values were unusually large, it would probably indicate an
erroneously marked point. You could go back through the images and
find the bad point(s), delete and re-mark them, and click ![]() again to repeat the calculation. If you find that this
does not help, use the
again to repeat the calculation. If you find that this
does not help, use the ![]() button to open the
Resampling page and click the [Residuals]
button. The table of residuals shows the difference in calculated
position and actual position for each registered point. A bad point
has a residual that is very high or very low. Identify the bad
points, close the dialog, and delete those points from the images.
Then re-calculate.
button to open the
Resampling page and click the [Residuals]
button. The table of residuals shows the difference in calculated
position and actual position for each registered point. A bad point
has a residual that is very high or very low. Identify the bad
points, close the dialog, and delete those points from the images.
Then re-calculate.
|
Tip |
You can copy, save, or print the Residuals table using commands in its menu. To open its menu, right click on the table. For example, you might copy the table, close the dialog, and then paste the table into a Mira Text Editor. |
Now that the transformation equations are known, we
perform the alignment. Click ![]() to do this and you
are done with image registration. Use the Animation Bar to scan
through the image set and view the results. If everything is well
aligned (and it should be because the RMS errors were small), then
you may wish to Save or
Combine the images (or do whatever you wanted
to do with registered images). If you don't like the result,
Undo the alignment and try again.
to do this and you
are done with image registration. Use the Animation Bar to scan
through the image set and view the results. If everything is well
aligned (and it should be because the RMS errors were small), then
you may wish to Save or
Combine the images (or do whatever you wanted
to do with registered images). If you don't like the result,
Undo the alignment and try again.
Let's look at how well aligned the images have become. Stars in the original images were tiny but mostly round. Therefore, the image of a star should also be round if all the images are added together. If not, then one or more of the images is not well aligned. Use the Process > Combine command in the menu (or on the Animation Bar) to combine the images using the Mean method. The picture below shows a region magnified 16x. This shows one very bright star and a number of faint ones. Notice that each of the combined stars is extremely round, which means excellent alignment.
As a final step, let us assess the quality of the
alignment in a quantitative way. Measure the centroid position for
a nicely isolated star that was not one of the registration points.
The positions should be very similar. In this example, use the star
at coordinate (661,603). Move the Image Cursor to near
this point and click the ![]() Centroid button
to compute the centroid positions in all images. The result looks
like this:
Centroid button
to compute the centroid positions in all images. The result looks
like this:
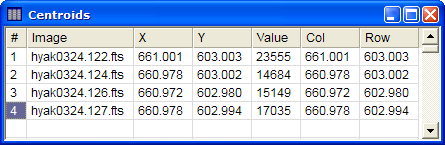
The X and Y centroid positions are intensity weighted coordinates of high precision. How do they compare? Actually, they are in good agreement for all 4 images. The typical difference, or scatter among them, gives an estimate of the exactness of the alignment. You can use your hand calculator to compute the mean and error of the mean position for each of the X and Y coordinates. We will quote the error of the mean, which is the uncertainty in the mean value; it is the standard deviation divided by the square root of the number of values in the sample (4 images gives a sample size of 4). Here are the results:
Mean X = 660.982 +- 0.0069
Mean Y = 602.995 +- 0.0053
The x and y coordinates agree to better than 1/100th of a pixel. That is good enough to write a book about!
In this tutorial we have taken a grand tour of image registration. We have examined all the factors that can affect the quality of the outcome. Typically, registration can be done much faster than in this case. If the images are of good quality and not far out of alignment, most of the detailed examination shown here can be bypassed and the results will be excellent.
Mira Pro x64 User's Guide, Copyright Ⓒ 2023 Mirametrics, Inc. All
Rights Reserved.