Merge RGB Images
The Merge RGB Images command combines 3 separate images that contain red, green, blue channels to make an RGB color image.
Open this command from the Process > RGB Images menu.
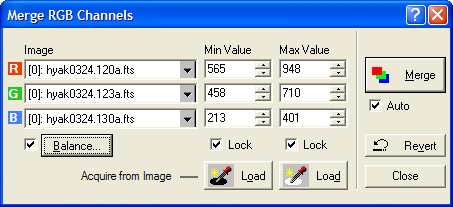
This command uses 3 input images to produce 1 output image, which is the merged RGB image. Using the Image Tree controls in the dialog, the 3 input images may be selected from the same Image Set in one window or they may be selected from different windows. Each input image must not be an RGB image itself.
The Auto check box enables automatic merging after a parameter change so that you don't have to keep clicking the Merge button. If you want Mira to automatically update the merged image after you change a parameter, Check this item. if the Auto box is not checked, Mira does an update only when you click the [Merge] button.
Oftentimes you will choose new setting that give a poorer result. The [Revert] button recalls the set of values used in the most recent, prior merging and updates the preferences with them. This is an "undo" for the preferences but not for the merged image.
The critical determinant of the brightness, contrast, and color balance is the choice of the Min Value and Max Value levels in the 3 input images. As described below, Mira gives you 3 ways to set these values.
The Min Value and Max Value parameters control the placement of the "black point" and the "white point" in the luminance values of the input images. When merged into the output RGB image, all pixel values lower than the Min Value are assigned "black" and all pixels above Max Value are assigned "white". These values do not need to be the same for each of the images. Typically they may be different if the images have different background signal or inherently different contrast. The particular values you use affect the overall brightness of the RGB image as well as its contrast and color balance.
Beyond wild guessing, there are 3 ways to choose the Min Value and Max Value parameters:
Use Values from a Prior Session. Mira saves the values from a session and loads them the next time you open the dialog. If you use a standardized procedure for producing RGB Images, this gives you known starting points so you can reproduce the same result each time.
Use Color Balance Settings. This option uses the values in the Color Balance Preferences dialog. With this method, filter factors are being applied to the R, G, and B channel input images. Use this method if you have standardized the method to use standard values for Min Value and Max Value and let the color filter factors control the brightness and color balance.
Use Samples from the Images. In this method, you choose pixel values from the R, G, and B images to specify actual values for Min Value and Max Value. This methods works only if the R, G, and B images are in an Image Set in the same window, because it uses the Image Cursor to load a sample of each image at the same location. To do this, you must select the Min Value before the Max Value. Simply move the image cursor onto a region you want to be absolute black in the merged image and click [Load] in the Min Value column. Then move the image cursor onto a region of the images that should be the lowest white value (i.e., the saturation point above which everything is pure white) and click [Load] in the Max Value column. You can adjust these values afterward to change the color balance, brightness or darkness, or the contrast.
Note that this is an interactive procedure and you can tune the preferences after each trial to home in on the best possible result. Simply adjust the parameters and re-Merge the images to get a new result.
When you adjust the Min Value or Max Value, there are times when you want to set the values independently, and there are other times when you want them to change together. To make the entire column of values change when you change one of them, check the Lock check box in the appropriate column.
Select the R, G, and B images from all displayed images using the so-named Image Tree controls. Select each image from the tree by double clicking on it.
Obtain the Min Value and Max Value settings using one of the 3 methods listed above.
Click [Merge] to combine the channel images. The result appears in a new window which remains attached to the Merge LRGB command. You do not need to close this new Image Window between merging cycles, as Mira overwrites the output image each time you merge.
If the brightness, contrast, or color balance are not what you want, change the settings in the Min Value and Max Value columns using one of the 3 methods described earlier. When you make the change Mira will re-merge if Auto is checked. Otherwise, click [Merge] after making your changes. Repeat this step until the desired result is attained.
The color attributes do not have to be "perfect" as a result of the present command, since there are simpler ways to fine tune them. You can finalize the brightness, contrast,. and color balance using the palette stretching technique with the mouse or by making adjustments in the Palette Properties dialog.