Register Images
The Register Images command brings the images of an Image Set into sub-pixel precision alignment. This command uses the Command Toolbar interface to work interactively with the images.
To open the Image Registration Toolbar, click Register in the Process > Geometry pull-down menu.
See the Tutorial, Introduction to Image Registration.
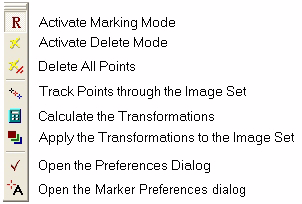
Image Registration commands operate from the toolbar shown below. When you execute the Register Images command, this toolbar toggles between open and closed. It opens along the left border of the target Image Window.
This assumes that the images are within ~10 pixels of alignment, Centroid Mode is enabled, and there is no rotational misalignment.
Open the Image Registration Toolbar. It opens in Marking Mode.
Click the mouse on an isolated star, sharp peak, or point highlight.
Click ![]() to track the point
through the image set.
to track the point
through the image set.
Click ![]() to calculate
the transformation equations.
to calculate
the transformation equations.
Click ![]() to apply the
transformations and bring the images into alignment.
to apply the
transformations and bring the images into alignment.
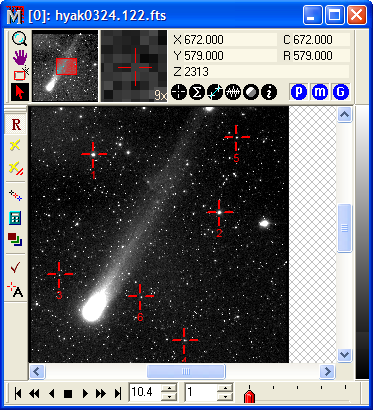
The Image Window below shows an image with 1 registration point marked on it. This is the minimum number of points and will handle a simple shift misalignment.
To register images, the software must determine the mathematical correction to be applied to each image so that features align to those on a master, or reference image. This involves matching similar points among the images so that, for example, coordinate A on the first image corresponds to coordinate B on the second image, and so on. Coordinates A and B form a coordinate pair. One or more coordinate pairs is needed to compute the relationship between positions on the pair of images. If the images differ by a simple offset, then a minimum of only 1 coordinate pair is required to compute the relationship as a simple x,y offset. If the misalignment is more complex, involving field rotation or scale changes, then at least 3 coordinate pairs are needed to compute the relationship between each pair of images. Mathematically, using the minimum number of coordinate pairs constitutes a minimally determined solution with no information about random errors. Using more than the minimum over-determines the solution so that a random error can be computed. Mira reports the random error as a root-mean-square, or RMS, value in each axis. For example, if the RMS is 0.1 pixels, then it can be expected that pixels in the neighborhood of the reference points are aligned typically with an error of 0.1 pixels. After the transformation is computed, Mira brings the images into alignment by resampling the intensities of all pixels onto the new coordinate grid determined by the transformation equations. An undo copy is saved for each image so that you can retrieve the unregistered images if you do not like the result.
The process of registering images can be classified into 3 main steps:
Collecting reference points from which the mathematical relationship between the images will be derived.
Computing the transformation equations that map all images onto a reference image.
Applying the transformation equations by resampling the images at fractional pixel positions.
Mira provides several ways to collect reference points, as described in step 1 of "Strategy":
Manual marking of individual points.
Tracking points from one image to other images.
Tracking followed by manually adding, deleting, or moving points.
If the images differ by small misalignments (say, 20 pixels or less from one image to the next), then you can use tracking. This means that you mark reference points on one image, then have Mira track those points to all other images in the image set. If the images have large misalignments, such as large rotations, significant scale differences, or mirror flips, then tracking will not work and you must manually mark the points on all images. The number of points marked on each image follows some rules based on the type of transformation being used.
If using the Shift method, then the same number of points must be marked on all images. Mira uses the mean coordinate of all points to determine the average relative shift between each pair of images.
If using the Shear method, Mira matches the pattern of points marked on each image in order to establish which points go into which coordinate pairs. Therefore, you do not have to mark the same number of points on each image. However, Mira must be able to match a pattern of at least 3 coordinates on each pair of images, since this is the minimum number of points required to compute a mathematical solution.
After points have been defined, Mira collects them from the image pairs and may compute a pattern match to determine which points form pairs for solving the transformation equations. As described above, if you use the Shift method, then points are not matched but their coordinates in one image simply averaged to get an average position from which the shift is determined. If the Shear method is used, Mira uses pattern matching to determine which points form pairs; all non-paired points are discarded from the coordinate pairs.
To mark points, various options are provided for the marker attributes and the centroiding strategy. See the Marking Preferences dialog.
One of the images is defined to be the reference image; this is the image to which the others are aligned. Usually the reference image is the first image of the set, but you can set it using the Image Registration Preferences dialog. The transformation equations are mathematical mappings between each image and the reference image. The transformation equations are computed by using the coordinate pairs to solve the equations you have chosen to describe the image misalignments. Mira reports the transformation coefficients in an Text Editor Window. If the solution is over-determined—that is, more than 1 point for the Shift method or more than 3 points for the Shear method—then Mira reports the RMS error of the registration.
After the transformation has been computed, the equations are applied to the image set to map all images onto the coordinate grid of the reference image. This aligns the images. To perform the alignment, the entire grid of pixel intensities must be re-calculated on the transformed grid. This process is known as re-sampling. The re-sampling process adjusts the pixel intensities to estimate what they would be if placed at a different position to sample a different location of the image. Mira saves a copy of each image before re-sampling. Therefore you can undo the re-sampling if you do not like the result.
Geometry Commands, Introduction to Image Registration, Image Registration Preferences