![]() Centroid
Measurements
Centroid
Measurements
The Centroid Measurement computes a high precision estimate of the position of a small object such as a point source.
To make a centroid measurement, position the
Image Cursor near
the target object, then click ![]() on the
toolbar or click Centroid in the Measure menu.
on the
toolbar or click Centroid in the Measure menu.
If an image set is open in the source Image Window, you can choose whether to measure only the active image or to measure the entire image set. If measuring the entire set, Mira finds each successive centroid by searching the next image within some radius of the current position.
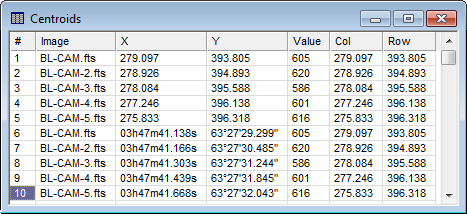
Measurements are tabulated in the Centroid Measurements window as shown below. This is a Report Window with built-in functionality for sorting, rearranging, copying, and saving to a file..

In this example, the first 5 measurements show images having no World Coordinate System ("WCS") calibration. Measurements 6 through 10 shows the same measurements when the images do have a WCS calibration.
Measurements for all objects in all images and all Image Windows go into a single Report window. If you want to clear the Report window of prior measurements, make sure the window has focus, then click View > Clear in the pull-down menu.
The items in the Report window are described in the table below.
Centroid Quantities
|
# |
The sequence number of the measurement. |
|
Image |
The name of the image that was measured |
|
X |
The X coordinate of the centroid position. If the image has a WCS calibration, this is right ascension, otherwise this is the column coordinate. |
|
Y |
The Y coordinate of the centroid position. If the image has a WCS calibration, this is declination, otherwise this is the row coordinate. |
|
Value |
The peak luminance of the object. |
|
Col |
The column coordinate of the centroid position |
|
Row |
The row coordinate of the centroid position. |
Report Windows, Image Set, Image Cursor, Centroid Preferences