Image Preferences
The Image Preferences page is a member of the Mira Preferences dialog. Use this page to configure the properties of an Image Window. You can change these preferences after an Image Window is opened or set the Parameters for all future Image Windows.
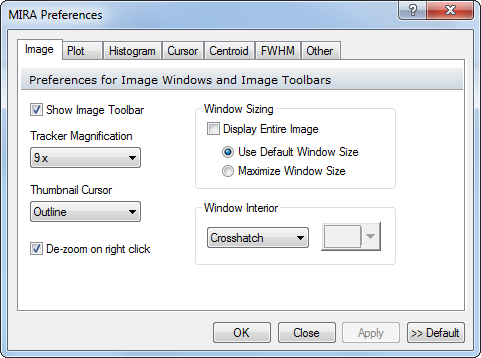
To open the Image Preferences page open the Mira Preferences dialog and select the Image tab.
This dialog is also opened using the View > Attributes command from the Image window's pull-down menu
|
Show Image Toolbar |
Check this box to show the Image Toolbar, or uncheck it to hide the image toolbar. Click [OK] or [Apply] to apply the change to the current image window. Click [Default] to apply it to all future image windows. |
|
Tracker Magnification |
Selects the magnification used by the zoomed view on the Image Toolbar. The options are 1, 3, 5, and 9 times the original image. You can also change the tracker magnification for an image window by double-clicking on the zoomed view itself. |
|
Thumbnail Cursor |
Sets the graphic mode for the small cursor that outlines the visible image on the pan view of the Image Toolbar. |
|
De-zoom on right click |
Check this box to have Mira de-zoom when you right-click on the image in Magnify Mode. Otherwise, the Image Context menu opens on right-click when in Magnify Mode. |
|
Window Sizing |
These options controls the size of an Image Window when first opened. Display Entire Image: Mira chooses a zoom factor that allows the entire image to be viewed. The image is shrunk if necessary but nor enlarged. Use Default Window Size: Mira lets Windows decide on the window size. Maximize Window Size: Mira makes the image as large as possible and keeps the image magnification at 1x. |
|
Window Interior |
Selects the mode of the window background outside the image. If you choose Solid Color, then you can also set the color using the button to the right of the selection. |
Set the preferences as desired, then accept the changes by doing the following:
To change only the active Image Window, click [Apply] or [OK].
To change all future Image Windows, click [Save].
When you are finished, close the Mira Preferences dialog.
Image Cursor, Image Windows, Mira Preferences, Image Attributes