Image Registration Example
The example below illustrates the basic steps of registering images using the Tracking strategy. This method can be used to quickly collect reference points if each successive image is within ~10--20 pixels of being registered to the previous one. This example considers the case of simple shift misalignment, which might be caused by the field of view drifting or wobbling but not changing scale or rotating. The latter situation requires using the Shear transformation. This example assumes that the images can be aligned using the Shift transformation. For more complex registration needs, see the Tutorial: Introduction to Image Registration.
For this example, a set of 3 images was loaded into an Image Window and the Image Registration commands was clicked to open the Image Registration Toolbar and begin the registration process. The main commands are operated from buttons on the Image Registration Toolbar. Should we need to change the properties of the registration, we open the Image Registration Properties dialog by clicking on the toolbar.
Usually it is a good idea to characterize the
images to determine the complexity of the registration. For
example, will a simple shift work? Is there rotation? When Mira
displays an Image Set, it also opens the Animation Bar at the bottom
of the Image Window. This makes it easy to characterize the images.
Click ![]() to start the image animation. You
might start with a frame rate of about 2 to 4 frames per
second.
to start the image animation. You
might start with a frame rate of about 2 to 4 frames per
second.
There are two observations we need to make:
How do the images compare, overall? Does there appear to be only a shift between the images? Or is there a rotation?
How does a point source look under magnification? Is it round? How much does it move between images? To get a magnified image, we could just place the mouse over a point and observe the magnified view, or we could magnify the entire image set and move it around looking for a good sharp feature common to all.
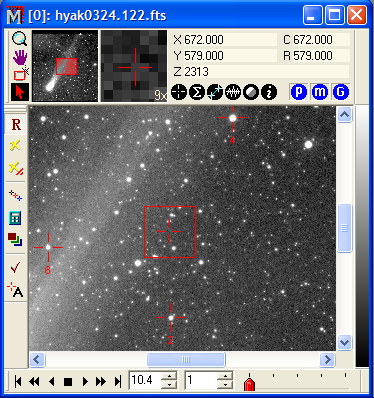
By stepping through the image set, we determined that the images had no significant rotation. therefore, we can get away with marking only 1 point on each image. Usually it is good to mark 5 to 10 points around the image to get a good overall "average" registration solution that is less sensitive to the statistical fluctuations of using 1 position in the presence of noise. The single marked point is shown in the first figure. The mouse was clicked near the point indicated. Mira found the local centroid position near where the mouse was clicked, then lock onto this position as the registration point. Note: You do not have to use centroid positions. Instead, you can have Mira adopt the literal position where you click the mouse.
Visualizing the images through animation begs the
question of how far out of registration the images actually are in
a numerical sense. To answer that, we should measure the centroid
position for a point such as the one we marked for registration. To
do this, we fist check that the Measure Image Set flag is set to measure the
entire set. The ![]() button on the
Image Bar should be
pressed. Next, we move the Image Cursor so that its center is near the point of
interest and click
button on the
Image Bar should be
pressed. Next, we move the Image Cursor so that its center is near the point of
interest and click ![]() to measure the centroids
of all the images. The results are reported in the Centroid
Measurements window as shown below.
to measure the centroids
of all the images. The results are reported in the Centroid
Measurements window as shown below.

By looking at the Col and Row columns on the right side of the table, we can see a shift of approximately 0.5 pixels in both directions. That is small, but certainly important to correct for some applications like combining the images by the Median value.
Now you need to have the same star position
measured in the other 2 images of the set. To do this we need to
track the positions through the image stack. Click ![]() to track the centroid position through the image stack. We
now have a registration point in all images. You might click the
to track the centroid position through the image stack. We
now have a registration point in all images. You might click the
![]() button on the Animation Bar to step through the
image set noticing where the tracked markers actually got placed.
If one is wrong, then you need to delete it (Shift + mark it
again) and then mark the point where it should be (if not in Mark
mode, click
button on the Animation Bar to step through the
image set noticing where the tracked markers actually got placed.
If one is wrong, then you need to delete it (Shift + mark it
again) and then mark the point where it should be (if not in Mark
mode, click ![]() to activate marking mode and then
click on the correct point).
to activate marking mode and then
click on the correct point).
Next we want to compute and apply the
transformations. The transformation calculates the amount to shift
the images to bring them into alignment. Click ![]() to calculate the transformation. If Verbose is
checked on the Resampling Properties page, the result of the
calculations is listed in a Text Editor like that shown below. We can save this,
perhaps after typing in some notes or deleting things that don't
need to be saved, using the Editor's menu commands. In the Editor,
below, dC and dR give the offset required to bring the images into
alignment.
to calculate the transformation. If Verbose is
checked on the Resampling Properties page, the result of the
calculations is listed in a Text Editor like that shown below. We can save this,
perhaps after typing in some notes or deleting things that don't
need to be saved, using the Editor's menu commands. In the Editor,
below, dC and dR give the offset required to bring the images into
alignment.
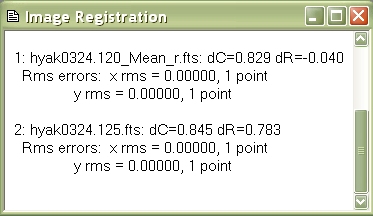
Since we marked only 1 point, the RMS errors shown
above are all identically 0. If more points were marked the RMS
would be positive and would estimate of the amount of uncertainty
in the transformations. In this case we are ready to apply the
transformation to align the images. This involves the process of
resampling the images, to re-evaluate their intensity values at
fractional pixel locations. To align, click ![]() . The
resampled images replace the original images in their Image
Window.
. The
resampled images replace the original images in their Image
Window.
The final step is to examine the quality of the
alignment. This calls for another round of animating through the
Image Set. On the Animation Bar, click ![]() to start
the animation. A numerical assessment could be made by measuring
the centroid position again for some well exposed, clean point
source in the image. If ~5 or more points are used so that the RMS
error is meaningful, then the amount of variation in the centroid
position should be about what you would expect from the RMS.
to start
the animation. A numerical assessment could be made by measuring
the centroid position again for some well exposed, clean point
source in the image. If ~5 or more points are used so that the RMS
error is meaningful, then the amount of variation in the centroid
position should be about what you would expect from the RMS.
Finally, if we don't like our work, we can perform an Undo and mark some more or some different points. When we get the result we want, the images are ready for Combining, Saving, or whatever application we had in mind.
Mira Pro x64 User's Guide, Copyright Ⓒ 2023 Mirametrics, Inc. All
Rights Reserved.