Imbed Image
The Imbed Image command inserts an image
into another image, treating the other image as a background. The
background (background) image may be considered opaque, in which
the imbedded image replaces all pixels underneath, or it may be
assigned a transparency value to blend with the pixels of the
imbedded image. The imbedding image is positioned over the
background image using "corner offsets" in the column and row
directions. The offset values are integral values and may be
positive, negative, or 0. To imbed an image with a fractional pixel
position, use the Shift
Image command to perform the fractional pixel adjustment and
then use the current command to complete the process using whole
pixel offsets.
-
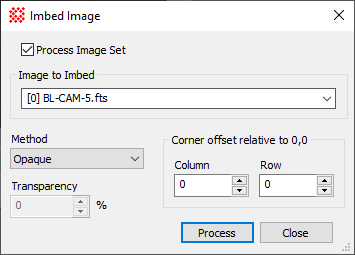
The Imbed Image command opens from the
Image Window > Process >
Geometry menu and  button
on the Main Toolbar. The "immediate"
form, shown first, opens when an image or image set is displayed in
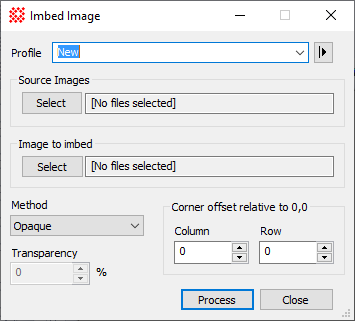
the top-most window. The general form can be used to select source
images from folders, windows, or by matching templates.
button
on the Main Toolbar. The "immediate"
form, shown first, opens when an image or image set is displayed in
the top-most window. The general form can be used to select source
images from folders, windows, or by matching templates.
Imbed Image Properties
|
Profile [|>]
|
Selects the parameter profile for this command and
allows you to save or work with existing presets.
|
|
[Select]
|
Opens the Select Source Images dialog to choose images
from an image window, folder, files, name template, or a Mira File
List.
|
|
[Select] Image to Imbed
|
Selects the image to be imbedded into the Source
images.
|
|
Method
|
Select Opaque or
Transparent for blending the
imbedding image with the background image:
Opaque mode replaces
the pixels of the background image.
Transparent mode
allows the imbedding image to be blended with the background image.
See Remarks below.
|
|
Transparency
|
Specify the transparency of the background image
as a percentage between 0 and 100.
|
|
Corner offset relative to (0,0)
|
Specify the column and row direction offset of the
corner of the imbedding image. Setting offset values of 0 and 0
pastes the imbedding image into the background image with their
origins aligned.
|
Transparency
This method imbeds, or "pastes", a second image
into another image which serves as the background, or "background"
image. The imbedding can be either opaque or transparent. If no
transparency value is specified, an opaque insertion is done—that
is, the second image replaces the background image underneath
it.
The Transparency
parameter specifies the percent transparent of the Background image. Transparency applies only over
the region where the two images overlap. To describe transparent
imbedding mathematically, consider imbedding image II into the current image IBG which acts as the background.
Converting Transparency from percentage T to a decimal value t, we have the following equation for the
intensity of the final image I:
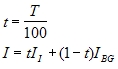
For example, if Transparency
= 25, then the current (background) image is only 25%
transparent, and the resulting image contains 75% of the current
image. By this definition, the opaque mode corresponds to a
transparency of 100 percent, in which the current image is totally
transparent and is replaced by the imbedding image. In general, the
higher the transparency value, the greater the percentage that the
imbedding image replaces the pixels of the background image.
Insertion Point
The insertion point is determined by coordinate
offsets in the background image where the origin (or "corner") of
the imbedding image is to be placed. Since pixel coordinates are
referenced to 1,1 at the image origin, the offsets to use are given
by the following formula:
Offset = Insertion Point
- 1
where Insertion Point
is a pixel coordinate in the Background image. Both column
and row coordinates obey the same formula. For example, to imbed an
image at background coordinate 400,
100, use Offset values
399, 99. Thus setting Offset values 0, 0
pastes the Imbedding image into the Background image
with the two origins aligned at pixel coordinate 1, 1.
Related Topics
Image Geometry Commands
Aligning Images
Mira Pro x64 User's Guide, Copyright Ⓒ 2023 Mirametrics, Inc. All
Rights Reserved.