Selecting Source Images
NOTE: This topic applies only to
global processing commands provided in the menus opened
using the ![]() button on the Main
Toolbar. The commands in this button menu select source (input)
images from files, folders, image windows, etc. A parallel track of
immediate mode commands is available from the menus for
Image Window
windows. The immediate mode commands simplify the image selection
process by obtaining their source images only from an Image
Window. For more information, see Command Dialogs.
button on the Main
Toolbar. The commands in this button menu select source (input)
images from files, folders, image windows, etc. A parallel track of
immediate mode commands is available from the menus for
Image Window
windows. The immediate mode commands simplify the image selection
process by obtaining their source images only from an Image
Window. For more information, see Command Dialogs.
Source images for global processing commands are the "input" images used by a parent command, such as images being rotated by Rotate Images or calibrated using Express Image Calibration. This topic describes the options for source image selection provided through the Select Source Images dialog. This dialog does not actually collect the images but sets the properties used for subsequent image collection by the parent command. Each parent command has an independent set of image selection properties.
For collecting source images, Mira commands use a common interface, the Source Images Control Group shown below. This group accesses the Select Source Images dialog for configuring how the command will collect its source images. This group is shown below as it appears on a generic command dialog. Use the [Select] button to open the Select Source Images dialog for setting source image selection properties. Later, when the command is executed, images are collected and processed according to the properties configured in the Select Source Images dialog.
Here is the Source Images Control Group appearing in the command dialog:

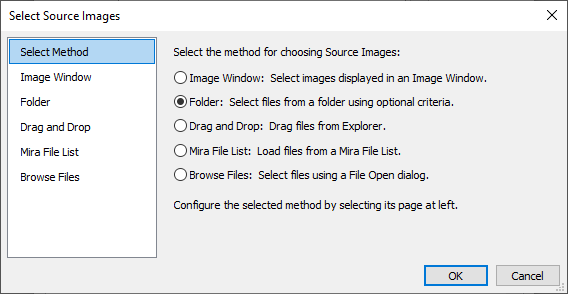
The Select Source Images dialog includes 6 pages: the Select Method page for choosing the source image selection method, and 5 pages for configuring each of the selection methods. Commands remember their source image selection properties, and these properties are initialized the next time Select Source Images is used by the command.
|
NOTE |
Selecting the source images from a window or one of the file options may also change properties appearing in the parent command dialog. |
Specifying how source images are collected is a two-step process. Usually, it is not necessary to complete both steps each time for a given command as the parameters are saved specifically for the command (for example, source image properties for Image Arithmetic and Rotate Image are saved independently). The properties for a given command do not usually need changing unless the image selection is volatile by using different file names, a different folder, different image window, and so on.
The source selection properties are configured in a two-step process using the pages listed in the left panel of the Select Source Images dialog. The top page, named Select Method..., is used to choose the source, while the 5 pages underneath are used to configure the source. This two-step process is outlined below. The order they are completed is not important:
Use the Select Method... page to select the source.
For the selected method, open its source page and configure the properties.
Each of the 6 pages in the Select Source Images dialog is described below.
The Select Method... page shows a bullet list of pages with options for selecting images. The selected (bulleted) method is passed back to the parent dialog using the properties configured on the specific method page. The method pages are configured by selecting them from the list in the left panel of the dialog. Click the name to configure the properties of the selected method. For example, the picture below shows the "Folder" method selected as the target method. To configure the Folder method,. click its name in the left panel and set its properties as desired.
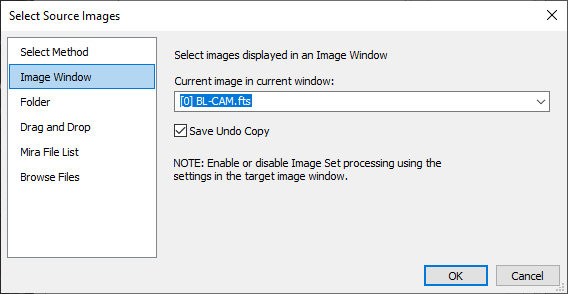
The Image Window page selects images displayed in an Image Window. The list box contains the name of the current image for each Image Window on the Mira desktop. The window list is created when this dialog is opened, and it will be empty if no Image Windows are open. If selecting images from an Image Window, it is often simpler to use the "immediate mode" version of the command from the Image Window menu (see Command Dialogs).
|
Current image in current window: |
Use the |
|
|
Check this box to instruct Mira to save an Undo copy of each image before it performs processing. Saving an undo copy increases the memory used by each image in the Image Window. |
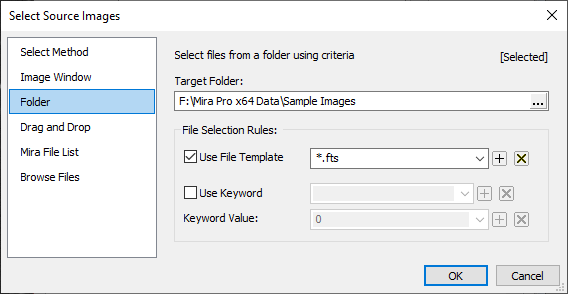
The Folder page selects images from files in a folder. Optionally, several file selection rules may be used to filter which images will be selected from the folder. If no rules are used, then all files in the folder will be selected. This page remembers its settings between sessions, however it is possible that the listed folder may not exist in a new session.
|
Target Folder: |
Use the [...] button to open a browser for selecting the folder containing the images. |
|
File Selection Rules: |
This group provides optional ways to filter files from among those in the selected folder. |
|
|
To use a file name template, check this box and specify the file name template in the list box to the right. The template may be as simple as a file extension or may be a more elaborate file name pattern using * and ? wildcard characters. Use the [+] and [x] buttons to add or delete the currently displayed entry. |
|
|
For images in FITS format, check this box to
select only image files that have the specified header keyword and
Keyword Value. For example, using Checking the |
|
Keyword Value |
Enter the value of the selection keyword. For example to select files that have an exposure time of 60 seconds, set the keyword as EXPTIME and the Keyword Value as 60. Use the [+] and [x] buttons to add or delete the currently displayed entry. |
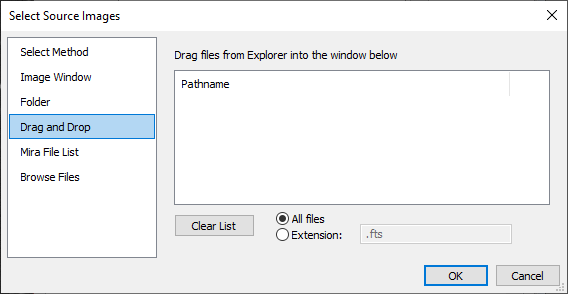
The Drag and Drop page provides a "hot" target area where files can be dropped using the Windows drag & drop technique. Files are selected by marking them in Windows Explorer (the file manager), then dragged onto the target area.
|
Select Files by Dragging form Explorer |
The large box is a "file drop target" that uses the Windows drag & drop protocol. You can mark more files than will be selected by filtering the files using a file Extension, |
|
[Clear List] |
Click this button to empty the list of files in the drop box. |
|
|
Bullet this option to select all files from among those dragged from Explorer. |
|
|
Bullet this option to select files matching a specified file name extension. Starting with those files dragged from Explorer, only files with the specified file extension will be dropped into the box. The above example shows that files matching the extension *.fts will be selected. |
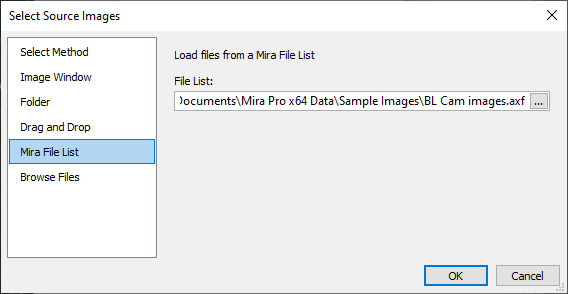
The Mira File List page is used for
selecting a Mira File
List containing the selected files. The Mira File List is a
single text file containing the full path specification for 1 or
more files. File lists have a .axf file extension.
This page remembers the file list between sessions, however it is
possible that the file list may not exist in a new session.
|
File list name: |
Use the [...] button to open a browser for selecting the Mira File List. |
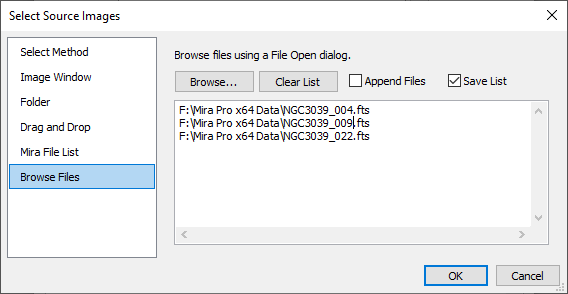
The Browser Files page opens a Windows Open dialog for selecting files. A powerful feature of this page is the Append Files option. This causes new files to be added to the list of files already in the box. The [Browse...] button activates the standard Windows Open dialog for selecting files. A limitation of the Open dialog is that it can only select files from a single folder at one time. Checking Append Files allows you to browse different folders, each time adding files from a new folder to the growing list.
|
[Browse...] |
Click this button to open a standard Windows Open dialog for choosing files. |
|
Clear List |
Click this button to clear the entire contents of the file listing. |
|
|
Check this box to allow new files to append the list of files already in the box. |
|
|
Check this box to save the file list for loading the next time this page is used for this command. |
Mira Pro x64 User's Guide, Copyright Ⓒ 2023 Mirametrics, Inc. All
Rights Reserved.