Tutorial: Displaying an Image
This tutorial describes how to display an image and make some basic adjustments. To learn about opening multiple images in the same window and working with them, see Image Sets.
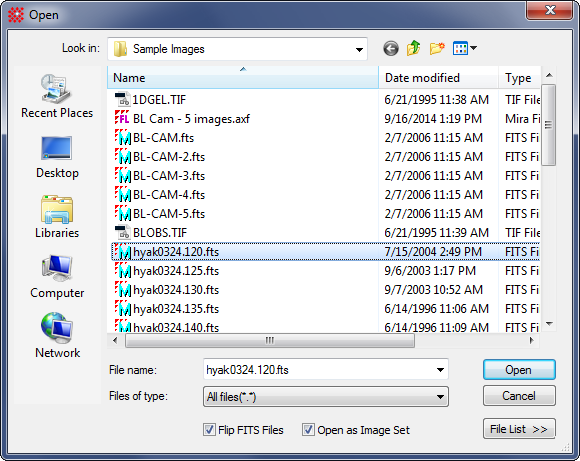
Start Mira in the usual way. Click the File command on the Menu Bar and then click [Open...] in the File menu. This opens the familiar the Open dialog shown below.
If you obtained a Mira installation that contains sample images, navigate to the folder <Documents>\Mira Pro x64\Sample Data. Otherwise, navigate to a folder containing one of your images and use it in the descriptions below.
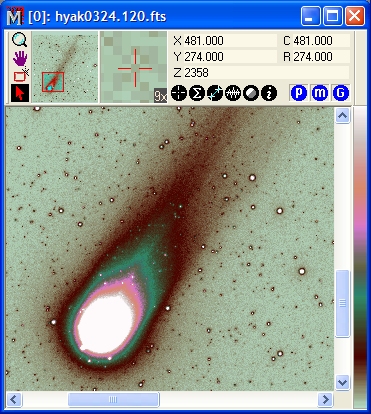
In the Open dialog, click on 'hyak0324.120.fts' to select it as shown, then click [Open]. An image is opened into an Image Window that looks like the one shown below. Note that the image appears small because it was scaled to fit the screen.

|
NOTE |
If a FITS format image opens upside down, open the Open dialog and check the Flip FITS Images option, then re-open the image. This option can also be set on the General Properties page. |
You might also use the File > Create Image Keyword List command to list image information such as columns, rows, filter,exposure time, etc., without having to display the images.
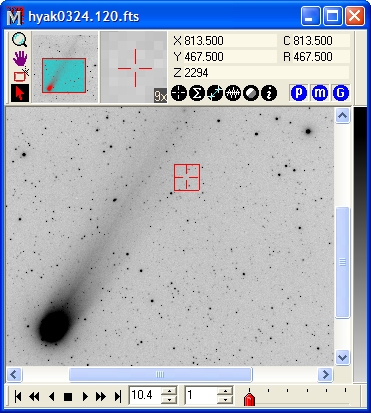
Along the top of the Image Window is a command center called the Image Bar. Two live parts of the Image Bar are the two auxiliary image views and the Image Coordinate Display section. The auxiliary views show a thumbnail that indicates the currently visible region and a magnified view that tracks the mouse pointer. The Coordinate Display section also tracks the mouse pointer, displaying both column and row position in the image (C and R) as well as the pixel value Z, and the World Coordinates X, and Y. World Coordinates refers to Right Ascension and Declination. This image has no World Coordinate System (WCS) calibration so (X,Y) equals (C,R).
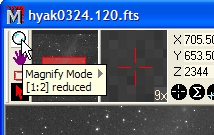
We now want to magnify the image. If the mouse has a thumb wheel, and the image window is active (on top; has focus), we can rotate the wheel to magnify the image. Otherwise, the quickest way is to use Magnify Mode. Move the mouse onto the button at the extreme top left corner of the window and let the mouse hover over the button. This is the Magnify Mode button. If you click it, Mira changes into Magnify Mode in which left mouse clicks on the image magnify it at that point. If you let the mouse hover over the button, a tooltip pops up as shown below.
In the previous figure, notice that the image shows
a large red square with a small central crosshair. This is the
Image Cursor, which
is a resizable tracking cursor used for defining positions and
rectangular regions on the image. The Image Cursor is used by a
number of commands and interactive tools. The Image Cursor expands
or shrinks as you change the image magnification (if you have not
already noticed this, try changing the image magnification while
watching the image cursor). This behavior shows that the image
cursor is connected to the image's pixel coordinate system rather
than the computer screen. The edges and center are always reported
to Mira internally as actual (fractional) pixel coordinates. Now,
we will change to Cursor mode to be able to adjust the Image
Cursor. Click ![]() to switch to Cursor Mode. (As usual with
cursor command modes, you switch out by clicking
to switch to Cursor Mode. (As usual with
cursor command modes, you switch out by clicking ![]() to return to Roam
Mode.) Note that you can also change modes by right clicking on
the image to open the Image Context Menu instead of the button
commands.
to return to Roam
Mode.) Note that you can also change modes by right clicking on
the image to open the Image Context Menu instead of the button
commands.
|
Tip |
Mira also provides a shortcut for changing between Cursor mode and Roam mode: the Ctrl+A keystroke. This accelerator toggles between these two modes or toggles into Cursor mode from any other mode. Alternatively, you can move the Image Cursor without switching into cursor mode. Simply hold down the [Shift] key and click the mouse on the target position. |
To move the Image Cursor in Cursor Mode, simply click on the image. To move it in another mode, hold down the [Shift] key and click the mouse on the target position.
The Image Cursor responds to "[left] mouse button down" by locking onto the mouse pointer, wherever it may be. Thus you can position or drag the Image Cursor by having the mouse button down. To resize the Image Cursor, move the mouse pointer over an edge or corner to see the pointer icon change to a double arrow. Then mouse down on that point and stretch the Image Cursor as desired. These moving and stretching operations work only while in Cursor Mode. You should use these actions to position the Image Cursor on a place of interest in the image. If the Image Cursor is lost somewhere outside the visible portion of the image, say when it is highly magnified, just enter Cursor Mode and mouse down somewhere on the image. That will relocate it to the point where you clicked. You can also position the Image Cursor at an exact coordinate (pixel or world) using the Go To Coordinates command in the Image Window > Coordinates menu or the Image Context Menu. The Go To Coordinates window stays open so you can dock it near the edge of the screen to use as needed.
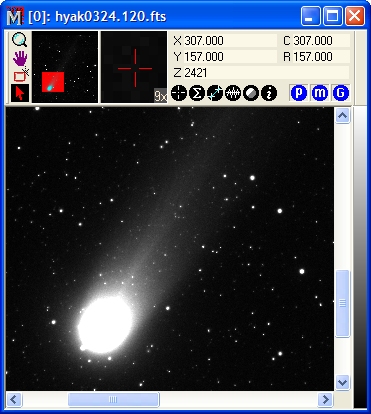
Let's play with the Image Palette. The right border of the Image Window shows the relationship between image "intensity" (or intensity, pixel value, count, ADU, etc.) and the color assigned to the view through the Image Palette. This region, which looks like a Grayscale ramp in these figures, is called the Image Color Map. The Color Map shows the current palette. To change the palette, move the mouse pointer onto the Color Map "hot zone". The pointer will change to a red/blue, yin/yang symbol to indicate that palette commands are available by clicking the mouse. Another type of display adjustment is made using commands in the View > Transfer Function menu. The picture below shows a negative Grayscale image which was made by inverting the contrast of the Grayscale palette.
To invert the palette and produce a negative image as shown above, use the View > Palette > Invert command in the main menu.
To adjust the palette contrast, brightness, and gamma, mouse down on the Color Map and drag the pointer around the screen.
To view palette changes, open the Palette Pane or open the Palette Properties dialog. You can work with palettes in greater detail using this dialog.
To reset the palette to its default settings, right double click on the Color Map.
A transfer function is a "rule" that describes how to "slice" the intensity range of an image into some number of levels for display. To each level is applied a color (or gray shade) entry from the palette. The transfer function is applied to intensity (i.e., non-color) images. A palette is applied to both intensity and color images. By changing either the transfer function or the palette assignments, you can change the way an image is displayed. Neither the transfer function nor palette affects the actual pixel values; they are both just display enhancements. You can prove this to yourself by adjusting the palette and noting the pixel values as you roam the mouse pointer around the image—there is no change in values despite the change in appearance. All measurements, processing, and plotting are also independent of transfer function and palette settings. For more information, see Image Palettes.
On the right border of each image window is a vertical bar of Grayscale or color, called the Color Map, or "Color Map" which is a hot area that takes action upon mouse dragging, double clicking, and right double clicking. Now, double click on the Color Map to open the Palette Properties dialog. Underneath the palette graph is a drop box containing the names of different palettes:
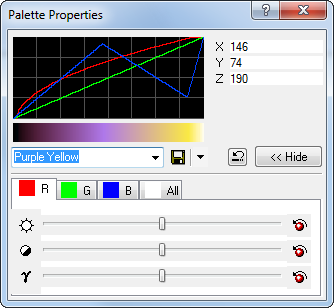
This drop box and its buttons to the right are called a Profile Control. The Grayscale palette is the default when an image is opened, and it performs a direct mapping of gray shade or color assignments to the image values. You can also apply false colors to the transfer function levels using a “pseudocolor” palette. Select the name 'Colorful' from the list as shown above. All images change to look like that below. You can keep the Palette open to change or adjust the palette, even while the images are animating. The Palette Properties attaches itself to the properties of the current image window (the one on top, or having focus).
Pseudocolor allows certain image features to be enhanced at the expense of others and represents a powerful say of visualizing images. In the drop list, select a different palette name and notice how the image window having focus changes to apply it immediately. You can adjust the contrast and brightness as described in the previous section and watch the palette change.
Mira Pro x64 User's Guide, Copyright Ⓒ 2023 Mirametrics, Inc. All
Rights Reserved.