Create Image Keyword List
The Create Image Keyword List command
generates a table of keyword values for a collection of images and
lists them in the Image Keyword Catalog Report Window where they
may be viewed, graphed, saved to a file, and otherwise processed
(see Report
Windows for details). For example, several images may be
selected from the list and displayed in a new Image Window, saved to a
Mira File List for
later processing, or graphed as one keyword versus another
keyword.
The related Search Keyword Values command creates a catalog
of images based on their keyword values. The current command helps
you determine which keywords are present.
-
The Create Image Keyword List command
opens from the Image Window > File menu and  button on the Main Toolbar. The "immediate" form, shown first,
opens when an image or image set is displayed in the front-most
window. The general form can be used to select source images from
files (folders, file name template, etc.) or an image window.
button on the Main Toolbar. The "immediate" form, shown first,
opens when an image or image set is displayed in the front-most
window. The general form can be used to select source images from
files (folders, file name template, etc.) or an image window.
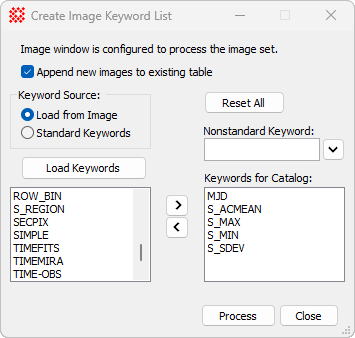

Create Image Keyword List properties
|
Profile [|>]
|
Selects the parameter profile for this command and
allows you to save or work with existing presets.
|
|
Select
|
Opens the Select Source Images dialog to choose images
from an image window, folder, files, name template, or a Mira File
List.
|
|
Process Image Set
|
For the immediate form of the dialog, this
controls whether the top-most image or the entire Image Set is processed from
the Image Window.
This is based on the current setting of the Processing image set flag.
|
|
Append new image to existing table
|
Permits the Image Keyword Catalog window to
accrue results from different runs of the Create Image
Keyword List command. Fulfilling this option requires that no
changes are made to the Keywords for
Catalog list. If the list is changed, then a new catalog
window will be created.
|
|
Keyword Source
|
Select where the keywords are obtained:
Load from Image scans
all target images to collect keywords from all headers.
Standard Keywords
lists the set of keywords recognized by Mira.
|
|
[Load Keywords]
|
Loads all keywords from the Keyword Source into the left-hand Source Keywords list box.
|
|
Reset All
|
Resets (empties) the left-hand Source Keywords box and right-hand Keywords for Catalog box.
|
|
Nonstandard Keyword
|
Supplemental or nonstandard keywords to be added
to the Keywords for Catalog list box. Click the down arrow to add
the keyword to the Catalog list box.
|
|
Standard Keywords
|
Reference keywords for populating the Keywords for Catalog list box.
|
|
[>] [<]
|
These buttons are used to move selected keywords
between the two list boxes.
|
|
Keywords for Catalog
|
The list of keywords that will be listed in the
catalog
|
Keywords to be listed in the catalog are taken from
the right-hand Keywords for Catalog
list box. These keyword were transferred from Source Keywords using the [>] button or transferred from the
Nonstandard Keyword field above.
Working with Images in the Report Window
The columns in the Report Window vary according to
the number of keywords specified.
|
Image Keyword Catalog Properties
|
|
Image #
|
Sequential number in table
|
|

|
Check this box to select images for display or
saving to a File List.
To select all images (or unselect all images), check the box in the
top header row. To display a single image, double click on it (with
or without the box checked).
|
|
Image Name
|
The image name, not including the file path.
|
|
<Keywords>
|
The selected keywords are each listed in columns
of the table.
|
|
File Path
|
The path of the image file.
|
|
Notes
|
The last grid column may be edited to add Notes to
the Report Window.
These notes are saved with the other grid data using the
Save As... command in the context
menu
|
After images are listed in the Report Window, a
substantial collection of graphing and other tools are available
for analysis. Some of these tools are available as commands in the
pull-down menus for the Report Window, while others are accessed by right
clicking on the grid to open its Grid Context Menu like that shown below. In
addition, you can work with data in the Report Window from scripts
using the CGridView script class.
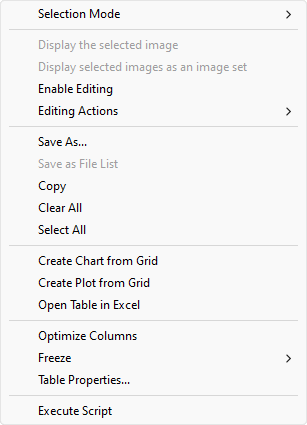
In the menu above, the Display
selected images as an image set command displays all checked
images in the Report Window as an Image Set. If only one image is checked, this command
is disabled and single image display is enabled.
The Save as File List
command saves all checked images as a File List for future use. The File List is also added to the
Recent Files submenu for easy
access.
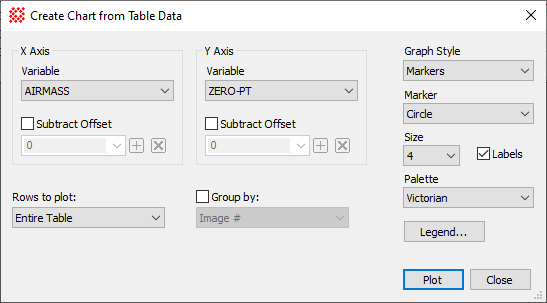
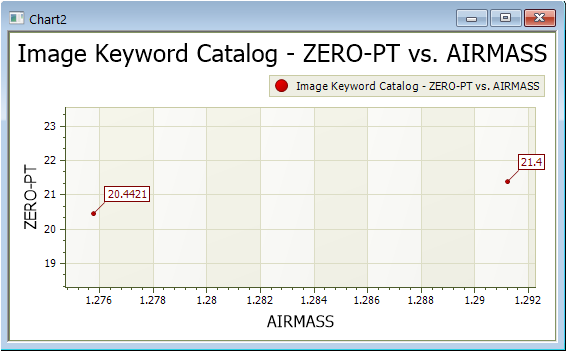
The Create Chart from
Grid command in the menu is used for graphing the
photometric zero point (ZERO-PT keyword) against the airmass of the
observation (AIRMASS keyword). The two pictures below show the
Create
Chart from Grid dialog and the chart (graph) created by
clicking [Plot] on the dialog. In
this example, notice that only 2 points appear in the chart because
only two of the images have values for both keywords.
Related Topics
Image Information
FITS Header
Opening and Saving Files
Plotting Images and Data
Grid Controls
Search Keyword Values
Mira Pro x64 User's Guide, Copyright Ⓒ 2023 Mirametrics, Inc. All
Rights Reserved.