Star Removal
The Star Removal module is used to remove stars from an image. This is done by first creating a master star profile template and then subtracting the master template from each target star. This procedure is used in photometry when the target object is not sufficiently isolated to obtain a good measurement without the influence of another star. The master template for the point spread function ("PSF") of the image is generated by marking one or more template sample stars. Once template(s) are marked, click on each of the target stars you wish to remove from the image. The user interface is a toolbar similar to that used in the Aperture Photometry package.
This command can use any number of template sample stars and it can remove any number of target stars. The templates and targets on one image also can be tracked through an image set similar to the way you do Aperture Photometry on a stack of images.
The Star Removal package uses a toolbar to operate
a suite of commands. To open or close this toolbar, use the
Measure > Remove Stars command or by click ![]() on the main toolbar.
on the main toolbar.
The toolbar has control modes for deleting markers and undoing stars you have removed from the image. Note that the two Undo commands restore target stars after they have been removed, so these modes work only with target stars. In comparison, the Delete modes delete some or all markers from the image. Therefore, using Delete mode, you also can delete the marker of a target star, which then makes it impossible to undo and replace that star back into the image. Of course, unless the image has been saved after stars were removed, then you still can recover the original image in which those stars are not removed.
|
Note: |
Be careful using Delete Mode or the Delete All command. After you have removed a target star from the image, it can be restored using Undo mode. However, if you Delete its marker, then you cannot Undo it and restore the star in the image. |
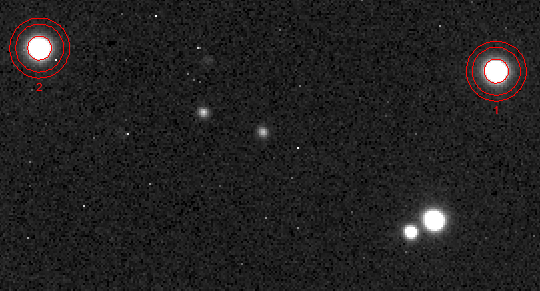
The example below shows a case in which a star interferes with the measurement of a minor planet. The minor planet is the middle of the 3 bright objects on the right side of the image.
In the "before" image below, two template stars (red) are marked on the image. These are used to create a master template.
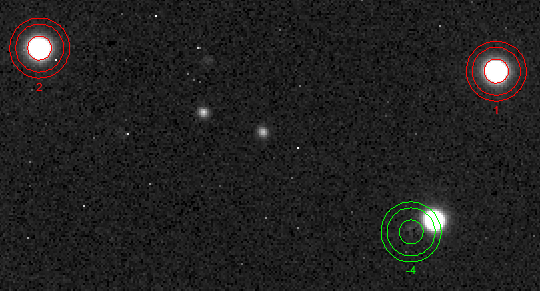
In the "after" image below, the interfering star (green) has been removed from the image. Photometry could now be done on the minor planet without interference from the star. Notice that the middle aperture, which defines the limit of template subtraction, extends onto the minor planet, so the profile of the interfering star is subtracted out of the PSF of the minor planet.
Each object marker has 3 apertures which define the edge of important parameters used in creating the master template and using it to remove stars from the image. The size, ellipticity, and orientation of the apertures are used for creating the master template and for removing stars using the template. The aperture parameters can be adjusted using the Star Removal Aperture Tool. The three apertures have these meanings:
Inner Aperture: All signal inside this aperture is used to normalize the template profiles and the master profile.
Middle Aperture: This aperture defines the pixels removed from the image when you apply the master template to delete a target star. This aperture also marks the inner boundary for pixels used for background subtraction.
Outer Aperture: This aperture marks the outer boundary for pixels used for background subtraction.
Generally, the aperture shapes and sizes are similar to those you might use for doing aperture photometry.
To calculate the master template for the star shape and to adjust that template to each star being removed, the background must be measured and subtracted. For each object, the background is determined by fitting a shape to the pixels inside the annulus bounded by the middle aperture and outer aperture. Several fitting options are provided on the Other preferences page in the Star Removal Preferences dialog. Usually, a 2x2 polynomial surface is sufficient to fit flat sloped, and slightly twisted background around the template and target objects.
The procedure involves marking a sample of template stars, which are accrued to build a master PSF template, and marking target stars to remove them from the image. You can also remove template samples from the master template and you can undo a deleted target star to restore it in the image.
The basic strategy is to mark 1 or more template stars, then mark the target stars you want to remove. This procedure is described below in more detail.
Click ![]() to enter Template Mode and click on star you want to use in
the master template.
to enter Template Mode and click on star you want to use in
the master template.
If you want to delete a marker from the image or image set, use one of these methods:
Click ![]() to enter
Delete mode and click near the center of each marker you
want to delete, or
to enter
Delete mode and click near the center of each marker you
want to delete, or
While in Template Mode, hold down the [Shift] key and click near the center of the template star you want to remove.
After deleting a template, click the ![]() button on the toolbar to recalculate the master
template.
button on the toolbar to recalculate the master
template.
To view the template, click ![]() to open the Preferences
dialog and click [Show Samples] or
[Show Template]. The master template
image is displayed in a new Image window. The template samples are displayed as
an image set in a new
Image window.
to open the Preferences
dialog and click [Show Samples] or
[Show Template]. The master template
image is displayed in a new Image window. The template samples are displayed as
an image set in a new
Image window.
To change the radius, ellipticity, or
orientation of the apertures, click ![]() on the toolbar to open the StarEdit
window. Parameter changes affect all templates and targets that are
already marked.
on the toolbar to open the StarEdit
window. Parameter changes affect all templates and targets that are
already marked.
Click ![]() to enter
Target Mode and click on each of the
target stars you wish to remove from the image.
to enter
Target Mode and click on each of the
target stars you wish to remove from the image.
If you accidentally remove the wrong target
star, click ![]() to enter Undo
Mode and then click on the marked
target star you wish to restore.
to enter Undo
Mode and then click on the marked
target star you wish to restore.
If you want to remove stars from an image set and
that image set is registered or almost registered, you can easily
extend the marked and removed objects from one image to the entire
image set. This is done in the usual Mira way by clicking the
![]() button on the toolbar. During
tracking, the location of each object is re-centered and processed
accordingly as a template or target. For each image, a master
template is calculated and then applied to remove all of the
targets..
button on the toolbar. During
tracking, the location of each object is re-centered and processed
accordingly as a template or target. For each image, a master
template is calculated and then applied to remove all of the
targets..
Aperture Photometry, Set Region Value, Star Removal Preferences, Star Removal Aperture Tool