![]() Aperture
Photometry
Aperture
Photometry
The Aperture Photometry package is used to make photometric measurements of stars and other small objects using the aperture photometry method. This suite of commands is extremely versatile and can be used for measuring 1 or more objects, with 1 or more standard stars, in 1 or more images. Applications include techniques such as differential photometry, time series photometry, and weighted ensemble photometry. The results can also be used for all-sky photometry, but Mira does not compute or apply the extinction corrections and color transformations.
This command uses the Aperture Photometry Toolbar (see below). This is a standard command toolbar interface to a suite of commands. Aperture photometry results are reported in a standard Mira Report Window.
To start or finish Aperture Photometry, use
Measure > Photometry or click ![]() on the Measurements Toolbar to open or close its
toolbar.
on the Measurements Toolbar to open or close its
toolbar.
View the tutorial Introduction to Aperture Photometry.
View the tutorial Doing Time Series Photometry.
To Measure an Object, click the mouse on each object. The result is reported in the Photometric Measurements Report window. If the ZERO-PT keyword is already present in the image header(s), the zero point value is included in the reported magnitude.
To change most photometry settings, click the
![]() button on the Toolbar to
open the Aperture Photometry Preferences dialog.
button on the Toolbar to
open the Aperture Photometry Preferences dialog.
Change aperture size and shape using the Aperture Tool window.
Measure an Image Set and Plot a Light Curve of targets, standards, and check stars.
The Kwee - van Woerden Solver can be used to calculate the time of minimum for a light curve.
If you are a member of the AAVSO, prepare an AAVSO formatted report of measurements.
Learn about setting header keywords for calculating airmass, photometric errors, and the zero point using the Photometry Keywords dialog. Note that the airmass is not calculated for an image unless you check the option on the Other preferences page.
To learn how magnitudes and errors are computed, see Magnitude Calculations.
Read about Photometric Measurement Definitions and Photometric Error Definitions.
To set or change the object name, notes, or
weight,
click the ![]() button on the toolbar to enter
Edit
Mode.
button on the toolbar to enter
Edit
Mode.
Select Heliocentric or Geocentric (normal) Julian Date from the Other Preferences dialog.
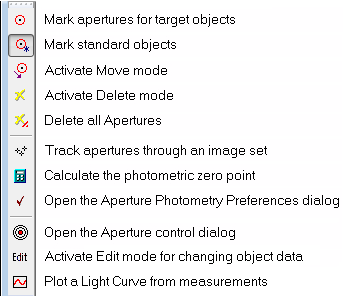
Aperture photometry commands are operated from the
toolbar shown below. Some commands are also accessed from the
Preferences dialog, which is opened using the
![]() button on the toolbar.
button on the toolbar.
The ![]() button calculates
and/or applies the photometric zero point for all images where
objects are marked, then updates the results in the Photometric Measurements table. This
calculation uses all specified settings and all standard stars
defined in all images. It is important to recalculate everything
after making certain types of changes such as changing the weights
of standard stars or making adding 1 or more standard stars to an
image or you make changes to the GAIN, RDNOISE, or EXPTIME keywords
for an image. If in doubt, click
button calculates
and/or applies the photometric zero point for all images where
objects are marked, then updates the results in the Photometric Measurements table. This
calculation uses all specified settings and all standard stars
defined in all images. It is important to recalculate everything
after making certain types of changes such as changing the weights
of standard stars or making adding 1 or more standard stars to an
image or you make changes to the GAIN, RDNOISE, or EXPTIME keywords
for an image. If in doubt, click ![]() .Mira
allows some flexibility in which keywords are used for the various
photometry parameters. The keywords can be specified using the
Photometry
Keywords dialog. The airmass is also calculated if the
appropriate keywords are found in the image header. The airmass
calculation uses the first 6 keywords specified in the
Photometry Keywords dialog.
.Mira
allows some flexibility in which keywords are used for the various
photometry parameters. The keywords can be specified using the
Photometry
Keywords dialog. The airmass is also calculated if the
appropriate keywords are found in the image header. The airmass
calculation uses the first 6 keywords specified in the
Photometry Keywords dialog.
The results of photometric measurements are listed in the Aperture Photometry Report Window. All reported values are defined in Photometric Measurement Definitions and Photometric Error Definitions. You can copy or save the results from this window, plot a light curve, or make a scatter plot of values in two table columns. For example you might plot the Error vs. Magnitude. If doing photometry of an Image Set, then you might plot Magnitude versus Julian Date.
Overview
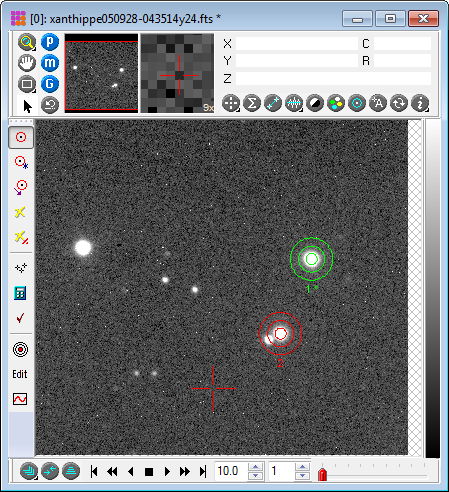
The Image Window below shows an image with 2 marked objects, one a standard star and the other the target object to be measured. Each marker includes 3 apertures. The inner aperture measures the total signal from the object + sky, and 2 outer apertures define an annulus for measuring the local brightness of the sky background. The background is subtracted from the [object + sky] measurement to obtain the net signal attributable to the object. This is converted to a magnitude as described above and is listed in the Photometric Measurements Report window. The Aperture Photometry Toolbar is shown on the left window border.
Each magnitude measurement appears in a Photometric Measurements Report Window. This window has a large amount of built-in functionality of Mira Report Windows which allow you to reorganize the table and save your results.
Object coordinates may be copied and pasted from one image to another or from one window to another using the Copy Markers and Paste Markers commands. You can also import coordinates from a text file using the Import Photometry Catalog command.
An existing marker may be moved around the image
to measure other objects without adding new positions. Simply click
the ![]() button to enter Move Mode.
Click inside the inner aperture of the marked object and drag it to
a new position. Each time you release the mouse to drop the
aperture, it centroids on the new position and reports the new
measurement in the table. You can disable centroid mode using
settings on the Points Preferences page.
button to enter Move Mode.
Click inside the inner aperture of the marked object and drag it to
a new position. Each time you release the mouse to drop the
aperture, it centroids on the new position and reports the new
measurement in the table. You can disable centroid mode using
settings on the Points Preferences page.
Marker parameters may be interactively adjusted using the Aperture Tool. You can adjust the shape between circular and elongated, and set the sizes and orientation of the apertures.
Mira provides a semi-automation capability for measuring objects in multiple frames using the importing facility. In this case, you import the coordinates of the objects from a text file "database" and have Mira process the objects in all images of an image set. Object data may be imported in (column, row) coordinates or, for FITS format images having a WCS (World Coordinate System) calibration, in (RA, Dec) coordinates. See the Import Photometry Catalog command.
Aperture Photometry Preferences, Tutorial: Introduction to Aperture Photometry, Tutorial: Doing Time Series Photometry, Import Photometry Catalog, Magnitude Calculations, Photometric Measurements Report, Aperture Tool, Report Windows, Photometry Keywords, Using Edit Mode in Aperture Photometry, Preparing an AAVSO Report, Plotting a Light Curve, Kwee - van Woerden Solver