Align on Object
The Align on Object command accurately registers an Image Set by shifting them into alignment relative to a diffuse object, such as a planet, nebula, or galaxy. This method accounts for image offsets ("shifts") but does not correct for field rotation or changes in image scale. For example, this method can be used to align a series of images of the planet Jupiter, in which Jupiter is 200 pixels wide.
Execute this command from the Process > Geometry menu.
This command has no dialog and is available only when an Image Set is opened in the top-most window.
To use this command, you simply stretch out a rectangle around the alignment object. Mathematically, this method chooses the biggest object inside this rectangle and uses that as the reference point for alignment. It is important that the rectangle be large enough that a good "blob" can be found inside it in each image. Therefore, you should draw the rectangle large enough to enclose the object in the current image and the next image. Mira will reset the rectangle to the new position in the next image and then repeat this procedure through the entire stack of images. It does not matter if the rectangle encloses multiple objects, such as some stars in addition to the a comet nucleus because this method chooses the largest object (in this example, the comet nucleus) for alignment.
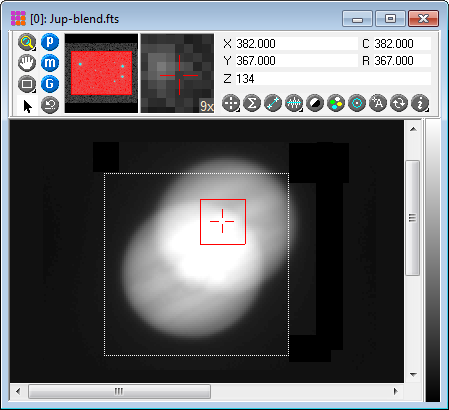
The picture below illustrates the range of motion of a drifting image of Jupiter. This composite image was made using the Image Arithmetic command to blend the two images that have the greatest offset from each other. However, the difference between Jupiter's position in one image and the next is much smaller. Here, the alignment rectangle is drawn large enough to include Jupiter in the first image and the next image, as Jupiter gradually drifts to the upper right. If, instead, Jupiter was wobbling randomly from one image to the next, then your rectangle should include the total range of motion over the whole stack of images. It does not harm to draw the rectangle a little too large.
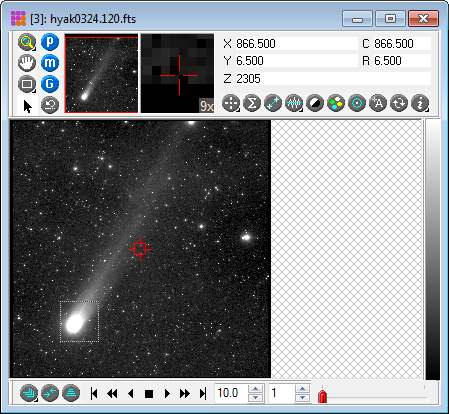
The picture below shows the alignment rectangle enclosing the nucleus of a comet. This creates a series of images in which the stars move but the comet remains fixed. The actual nucleus is smaller than the white blob shown in the picture. The resulting alignment is excellent at the sub-pixel level of accuracy, even though many stars being included in the rectangle.
Make the target image window the top-most window.
Scan through the Image Set to determine the extreme limits in movement of the alignment object over the entire Image Set.
Execute this command from the Process pull-down menu or the Animation Toolbar.
Draw an enclosing rectangle on the image that will include the full range of movement of the object, as follows:
xca. Mouse down on one corner of the rectangle and drag to the opposite corner.
xca. Release the mouse at the opposite corner to align the images.
If you do not like the result, use the Undo command to revert to the un-aligned images.
There are two other image alignment methods available:
Align on Point: Use this command when the alignment object is a sharp point source, such as a star.
Register Images: Use this command when one or more of the images differ in scale or rotation, or have other deformations like non-square pixels or non-perpendicular axes.
Image Geometry Commands, Align on Point, Register Images, Aligning Images