Open the Aperture Tool by clicking ![]() on the Aperture Photometry Toolbar.
on the Aperture Photometry Toolbar.
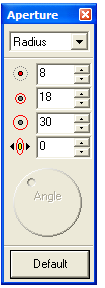
Aperture Tool
The Aperture Tool is a small floating Tool Window used to adjust the shape of the markers used in the Aperture Photometry package.
Open the Aperture Tool by clicking ![]() on the Aperture Photometry Toolbar.
on the Aperture Photometry Toolbar.
 The Aperture Tool
Window makes it easy to change the marker parameters. Doing so
changes the amount of signal being measured through the inner
aperture ad affects the measurement of the local sky background
between the 2 outer apertures. In the description below, the term
"marker" refers to the set of 3 apertures used to mark and measure
each object.
The Aperture Tool
Window makes it easy to change the marker parameters. Doing so
changes the amount of signal being measured through the inner
aperture ad affects the measurement of the local sky background
between the 2 outer apertures. In the description below, the term
"marker" refers to the set of 3 apertures used to mark and measure
each object.
Using the Controls
The top-most control is the Mode selection box. Mira provides two ways to express the size of the measuring apertures: directly in radius or as a scale factor that multiplies the FWHM of the image. Select Radius or Scale, and the values in the aperture size fields will change to the appropriate values.
The upper 3 edit fields show the size of the measuring apertures. The units displayed depends upon the mode setting:
Radius, specifies the radius directly in units of [pixels].
Scale, specifies the radius indirectly in terms of scale factors that multiply the image FWHM as measured in [pixels]. The FWHM must have been previously measured for the image and the value stored in the image header as the PSF-FWHM keyword.
All aperture measurements equate to radius, in
dimensions of [pixels]. The mode Radius or Scale (top
of window) is specified on the Other
Preferences page opened from the ![]() button on the Aperture Photometry Toolbar. Values can be set
for each of the aperture rings. Actually, these settings control
the semimajor axis of each aperture, since Mira considers apertures
to be elliptical (Note: for a circular aperture, the semimajor axis
equals the radius). From the top control downward, these 3 fields
show 1) the inner aperture that measures the object, 2) the inner
sky aperture, and 3) the outer sky aperture. Needless to say, these
three apertures should have radii in increasing order.
button on the Aperture Photometry Toolbar. Values can be set
for each of the aperture rings. Actually, these settings control
the semimajor axis of each aperture, since Mira considers apertures
to be elliptical (Note: for a circular aperture, the semimajor axis
equals the radius). From the top control downward, these 3 fields
show 1) the inner aperture that measures the object, 2) the inner
sky aperture, and 3) the outer sky aperture. Needless to say, these
three apertures should have radii in increasing order.
The control above the large round dial, changes the Ellipticity of the markers. Ellipticity is defined as E = 1 - b/a, in which b is the semiminor axis and a is the semimajor axis length. All 3 apertures have the same ellipticity, so they also change together. Setting a value of 0 makes the apertures circular.
The Angle dial orients the direction of the major axis of the marker. This is only useful if the Ellipticity is greater than 0, meaning that the apertures are not circular. The angle is always measured so that it increases from positive x through positive y (see Angle Measurement Definition), except that the astronomical 0 angle is taken along the y axis, which is north (up) if the image is a FITS format image displayed in the normal way.
The [>> Default] button saves the current aperture parameters as default values for future sessions of the Aperture Photometry package.
Which Window is Talking to the Aperture Tool Window?
The Aperture Tool is shared by all Aperture Photometry procedures that are open in various Image Windows. The tool talks to the top-most image window having an open Aperture Photometry Toolbar.
The Aperture Tool communicates with the top-most Image Window where an Aperture Photometry Toolbar is active.
If you have more than one Aperture Photometry process active, you can see the values in the Tool Window change when you click on the different windows. One useful result of this is that you can easily compare the effect of different aperture parameters by opening the same image(s) for aperture photometry in a number of separate Image Windows. Simply click on each window in turn to connect it with the Aperture Tool and then change the settings. This also shows why each Image Window is connected to a different Photometric Measurements Report window.
Aperture Photometry, Photometric Measurements, Other Preferences, Star Removal Package