Express Calibration
The Express Calibration command performs standard operations to calibrate images in the value sense (as opposed to calibration in the x,y or spatial sense). This command applies any or all of the bias, dark, and flat field corrections to one or more images displayed in a window using master calibration images existing in files. In comparison, the more versatile, but more complex Image Calibration command can also create the master calibration frames and can process images from either a window or folder. To create the master calibration frames for the Express Calibration command, you would normally use commands like Calibrate Images, Combine Images, and Image Arithmetic.
The Express Calibration command is opened from the Process pull-down menu.
This command is can process one or more images displayed in an Image Window. The number of images to be processed is controlled by the Processing button on the Image Toolbar. During a long calibration of many images, you may need to cancel the processing rather than take the time to allow it to finish. To terminate the processing before the task has completed, click the [Cancel] button on the Progress window.
|
Tip |
To abort the calibration before it is finished, click the [Cancel] button on the progress window. Mira will prompt you for verification to quit. If you confirm, the task will terminate immediately. |
The [Apply] button saves the settings but does not apply the calibrations. Use [Run] to perform the calibration and automatically save the settings.
The Image Calibration Pipeline (Calibrate Images command) is an alternative to Express Calibration. The present command performs basic, accurate calibration operations on images. However, only the standard bias, dark, and flat field corrections are available using master calibration frames that must already exist. For many purposes, this may be sufficient and you do not need to use the more powerful, but complex Image Calibration Pipeline. In comparison, the Image Calibration Pipeline offers alternative bias corrections, such as overscan column bias, and can create master calibration frames separately or as a full processing pipeline.
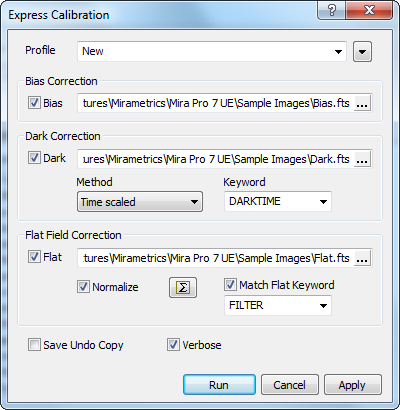
The bias correction is performed by subtracting a master bias frame. This removes the detector's electronic offset level from the image on a pixel-by-pixel basis. To enable the bias correction, check the Bias option, then select the master bias frame from a file by clicking the [...] button on the right of the file name field.
Dark frame correction is performed by subtracting a master dark frame. This removes the thermal signal pattern from the image. Several methods are available. Normally, the dark frame will have the bias removed if the Time Scaled or Optimized method is used.
To enable the dark correction, check the
Dark option, then select the master
dark frame from a file by clicking the ![]() button on the right of the file name field. Then
setup the dark correction method as described in the table
below.
button on the right of the file name field. Then
setup the dark correction method as described in the table
below.
Dark Correction Methods
|
Direct |
Subtracts the dark frame directly from the image with no adjustment. To use this method, the detector temperature control must be stable and the exposure time equal to that of the image. |
|
Time Scaled |
Scales the dark frame to the image according to the time that thermal signal was allowed to accrue. The scale factor is determined from a keyword stored in the image header. Usually this keyword is named DARKTIME but the exposure time EXPTIME may be used to approximate the dark integration time. You can set any keyword you wish. |
|
Optimized |
Scales the dark frame to the image in an iterative way so as to minimize the noise level after dark correction. Use this method if the detector temperature fluctuates. |
Flat Field correction is performed by dividing a master flat frame. This corrects the illumination pattern and the pixel-to-pixel response variations present in the image. Normally, the bias and dark corrections will have already been applied to the master flat field frame.
To enable the flat correction, check the
Flat option, then select the master
flat field frame from a file by clicking the ![]() button on the right of the file name field.
Setup the flat field correction options as described in the table
below.
button on the right of the file name field.
Setup the flat field correction options as described in the table
below.
Flat Field Correction Options
|
Normalize |
Adjusts the flat field frame to a central
brightness of 1.0. Normally, the flat field correction frame is
normalized before being stored in the file. However, the normalized
flat must be in 32 bit or 64 bit real format. Use this option if
the flat is stored as an integer type image or has not been
previously normalized. The normalization region is configured using
the |
|
|
Opens the Region Statistics dialog to configure region statistics used to normalize the flat field frame. |
|
Match Flat Keyword |
Check this box to require that a keyword match exist between the flat field frame and any target image to which it will be applied. With this option checked, the flat field correction is not applied if the specified keyword values match in the flat and target image. Usually, the matching is done by filter name, but you may use any criterion you wish, provided there exists a pertinent keyword in the image headers. If this box is checked, specify the keyword in the provided list box. |
|
(Keyword) |
This history drop box specifies the keyword used to match the target images when applying the flat field frame. This is used only if the Match Flat Keyword box is checked. Typically, the FILTER keyword is used to match the flat to images. |
If the Save Undo Copy box is checked, you can undo the calibration afterwards; saving an undo copy doubles the memory requirement for the images being calibrated but allows you to recover your data if you do not like the calibration results.
If the Verbose option is checked, Mira logs processing messages in a Text Editor window. The messages appear after the calibration task finishes. The log entry also lists the clock time at which each image was processed (see the sample below). If a calibration error occurs, Mira stops the procedure and lists the error message in the log. Since the calibration log uses a Mira Text Editor, you can save, edit, or print the messages in the normal way.
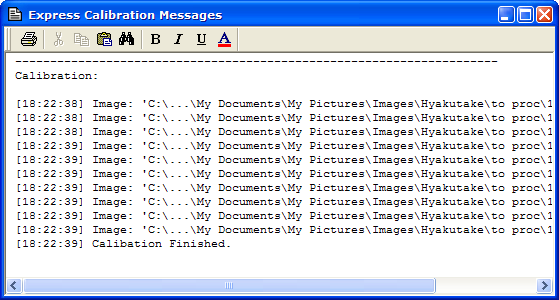
If the calibration procedure succeeds for an image, the word "Success" is listed after the image name (which is scrolled beyond the right margin in the window shown here). If an error occurs, a detailed error message is listed. Compare the simplicity of these messages with the more detailed messages given by the Image Calibration Pipeline.
Image Calibration (Pipeline), Combine Images, Image Arithmetic