Image Calibration (Calibrate Images command)
The Calibrate Images command uses the Image Calibration dialog to perform quantitative image processing operations on CCD images. Most of the functions are related to the process of Luminance Calibration (see Calibrating Images).
Using this versatile command you can perform operations as simple as creating a master bias frame or repairing CCD column traps, or as complex as creating and applying all the standard CCD calibration steps beginning with a folder of raw images. When used to its fullest potential, this command can automatically "pipeline" the many detailed calibration steps required to calibrate CCD images.
Execute the Calibrate Images command from the Process pull-down menu or from the Main Context Menu.
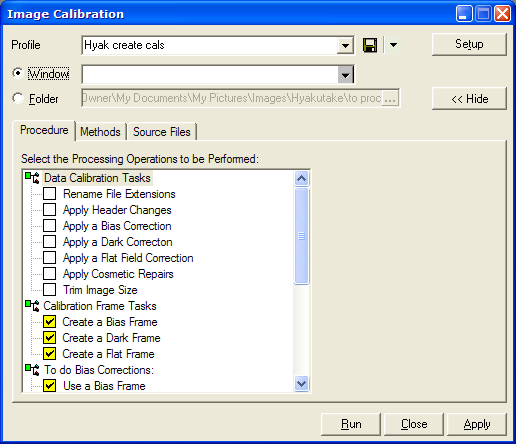
The Calibrate Images command works through the Image Calibration dialog shown below. This dialog organizes the layers of a complex image calibration process into a procedure that applies detailed processing methods to displayed images or source files. For less complex procedures, the Express Calibration command can also be used to apply the basic calibration steps to a set of displayed images.
Note that all images processed through one run of the pipeline must have the same dimensions (rows x columns). Therefore, you should cull images of different dimensions into separate folders before running the pipeline on them.
The dialog uses a Profile Control to manage and remember the procedure and method settings involved in a calibration task. You may create and re-use any number of profiles to meet the needs of different calibration techniques or data sets.
Images to be calibrated ("data frames") may displayed in an Image Window or opened from files inside a folder.
Master Calibration images ("calibration frames") may be created from raw calibration images or loaded from those already existing.
The calibration methods support creation and application of a library of master dark frames segregated by time as well as a library of master flat field frames segregated by filter name.
Some calibration methods require information from the image header, such as exposure time, dark time, or filter name. Procedures that require header information work only with FITS format images as FITS format saves this type of information.
The Image Calibration dialog organizes a complex hierarchy of operations used to calibrate images: At the top level is the procedure that defines which operations need to be applied. The procedure then uses various methods to perform needed steps of the procedure. For example, applying bias and dark calibrations is a procedure. Creating a bias frame and a dark frame and applying them to the data are the methods that achieve the steps of the procedure. The procedure is applied to images that may reside in a display window or in a folder; when in a folder the particular source files must be selected from among many files of mixed types. These three aspects of the calibration process are organized under 3 tabs in the Image Calibration dialog, these being Procedure , Methods , and Source Files.
There are both simplistic ways and sophisticated ways to make master bias, dark, and flat field frames and then apply them to images. Especially if you are starting with only raw CCD images, to do all this correctly guarantees a huge amount of bookkeeping and processing steps ahead. The image calibration interface in Mira was designed to meet such complex requirements in a way as straightforward as possible to the user, yet maintain maximum flexibility to meet different needs for different types of data.
To understand how the calibration dialog works, consider the following need: "I need to correct my images for Dark Current." To do this makes a requirement: You must have a dark calibration frame. But this seemingly simple procedure may unfold into a long sequence of operations that must be performed. For example:
Do you have a master dark frame? If yes, then you can apply it. But if not, then you need to make one.
How do you make a master dark frame? There are various ways to do this.
To make a master dark frame, you may need to combine many separate dark frames.
Before combining dark frames into a master dark, you may need to remove bias from each one.
If you need to remove bias from the raw dark frames before combining, then you may need a master bias frame.
How do you make a master bias frame? There are various ways to do this.
Finally, assuming you have a master dark frame, you must apply it to your images. But before applying the dark frame, you may also need to apply the bias correction to the target images.
To recapitulate: To understand how the auto-calibration logic works in Mira , just follow your own thought process: How would you do it manually? The questions you need to answer are 1) Which steps do I need to perform? 2) Which methods do I use? and 3) Which files or images should be used?
The Image Calibration dialog organizes calibration tasks into 3 sections:
Procedure: The procedure selects the particular calibration tasks you want to perform. For example, applying a bias correction to your images is a procedure. Applying a pixel mask is a procedure. Making the bias frame itself is also a procedure. Similarly, creating and applying a bias correction, dark frames, and flat field corrections is also a procedure Each of the available procedure steps is listed in the tree control on the Procedure tab. To setup a procedure, you simply check each of the steps the procedure is to perform.
Methods: Each step of a procedure uses at least one method. For example, there are a number of ways to apply a dark correction to an image. You could subtract a dark frame directly, or it could be scaled by the ratio of exposure times, or you could perform an optimized dark subtraction which minimizes the dark noise in the processed frame. Each of these methods has a set of instructions for how to apply it. The Parameters for all the available methods are organized in a tree format on the pages under the Methods tab. When you select a method from the tree, its preferences page opens for editing.
Source Files: When calibration steps involve loading images from source files, Mira needs to know which files to use and where to get them. There are 4 basic types of files involved in image calibration: Bias, Dark, Flat, and Data frames. These are specified on the pages under the Source Files tab. There are also calibration methods that do not involve use a master calibration frame, such as column bias or bias value correction. The types of source files are described in Image Types.
The [Setup] button opens the Processing Preferences dialog. This dialog contains additional Parameters for the image processing pipeline which are not actually part of a procedure.
Images from array detectors like CCD's are usually referred to as "frames". This has an historical basis in the use of television technology used both for acquiring and displaying 2-D images prior to the invention of the CCD. Raw image data to be quantitatively calibrated will contain calibration frames for correcting for the detector bias, dark, and flat field effects. Mira , or any other auto-calibration software, must be able to distinguish these different types of images in order to apply them in the proper way. Images can auto-identify themselves using the Image Type concept. The image type, or other method for identification, is entered on the Source Files tab of the Image Calibration dialog.
When calibrating images in Mira, the data frames may be opened from a display window or from files inside a folder. Master calibration images are usually opened from files, but pre-existing master bias, dark, and flat frames may also be selected from displayed images. When multiple master darks or master flats are used to accommodate different exposures or filters, a single calibration frame does not suffice, so you must specify the master files using a file name template (for example, 'master dark*.fts') or by using the resulting master frames that were created in the same procedure.
|
Note |
If the procedure opens a master calibration frame rather than creating it, then the master frame must be prepared to the proper degree. For example, a master flat opened from a file should be bias subtracted, dark corrected, normalized to 1.0, and stored as a 32-bit real type image. |
The calibration pipeline uses almost 500 settings to control all its options. Managing this configuration could be a nightmare without good organization and an easy way to save and retrieve settings. That is why this dialog uses a Profile Control to do the work for you. When you get all the preferences set as you want them, save them as a profile. You can have as many profiles as you want. Just select the profile from the list and all of the preferences are loaded for you.
The target of the image calibration procedure can be images displayed in an Image Window or files in a folder. Specify your choice by clicking the appropriate bullet on the Image Calibration dialog:
Window instructs the dialog to Data Images in an Image Window. If there is more than 1 Image Window on the screen, you must select the target window from the Image Tree control. Mira saves the processed images into the same Image Window. If the Undo option is selected in the Processing Preferences dialog, then you can undo the calibration at the expense of saving all of the original images in memory.
Folder instructs the dialog to process files located in a folder. The resulting files are saved into the same folder. You must give Mira two pieces of information to process files from a folder:
![]() Which
folder contains the files; this is specified as the
Folder parameter on the main dialog.
Which
folder contains the files; this is specified as the
Folder parameter on the main dialog.
![]() Which
files to process; the files are specified on the pages under
the Source Files tab.
Which
files to process; the files are specified on the pages under
the Source Files tab.
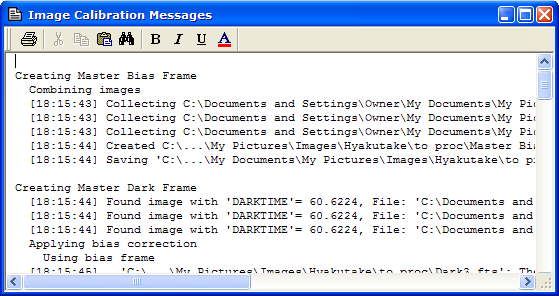
If the Verbose option is checked in the Processing Preferences dialog, Miralogs processing messages in a Text Editor window. The messages appear after the calibration task finishes. The log entry also lists the clock time at which each image was processed (see the sample below). If a calibration error occurs, Mira stops the procedure and lists the error message in the log. Since the calibration log uses a Mira Text Editor, you can save, edit, or print the messages in the normal way.
Compare the detailed messages above with the more streamlined messages of the Express Calibration command.
Procedure tab, Methods tab, Source Files tab, Processing Preferences, Image Types