The Go To Source
Image command is activated using the ![]() button on the Plot Bar or the View > Find
Image Window command in the Plot Window's pull-down
menu.
button on the Plot Bar or the View > Find
Image Window command in the Plot Window's pull-down
menu.
Go to Source Image
The Plot Window's Go To Source Image command brings the source Image Window to the top of the window stack, selects the source image, and moves the image cursor to the location where the plot was generated. This is useful for finding the source of the plotted data when several Image Windows or Plot Windows are stacked on the Mira desktop.
The Go To Source
Image command is activated using the ![]() button on the Plot Bar or the View > Find
Image Window command in the Plot Window's pull-down
menu.
button on the Plot Bar or the View > Find
Image Window command in the Plot Window's pull-down
menu.
The target source image depends on the number of plots displayed in the Plot Window and the current Animation mode:
|
Plot Window Displays: |
Target: |
|
One plot series |
The source Image Window, source image, and image cursor coordinates on the image. |
|
Multiple plot series in Overplot Mode |
The source Image Window, source image, and image cursor coordinates on the source image. |
|
Multiple plot series in Animate Mode |
The source Image Window, first image, and image cursor coordinates on the first image |
When either a single plot is displayed or Overplot Mode is enabled, the target image that generated the plot is completely determined. In this case, the image or image set will be set to the source image and the image cursor will be positioned on that image. If Animate Mode mode is enabled, the target is the first image of the source image window and the image cursor is positioned on that image.
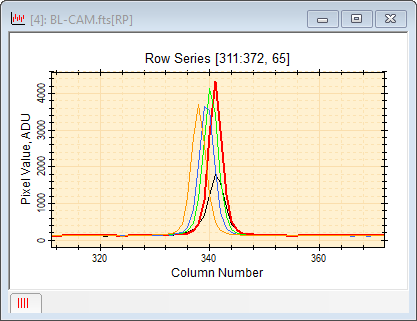
In the following example, 10 Image Windows were opened, some of which included an image set with 5 images. A horizontal plot was generated for the 10-image image set and that Image Window was buried in the window stack. The Plot Window below shows the horizontal plot for the image set in Overplot Mode. Note that the Image Plot Properties was set to use colors black, red, green, and blue, etc. for sequential image set members. For emphasis, the line thickness for image 2 in red was set to a wider 1.5 points:
Using View > Find Image Window command in the Plot Window's pull-down menu. Since multiple plots are shown, the specific target image cannot be determined. As a result, the first image of the target window was selected. The target window was brought to the top of the window stack as shown below:
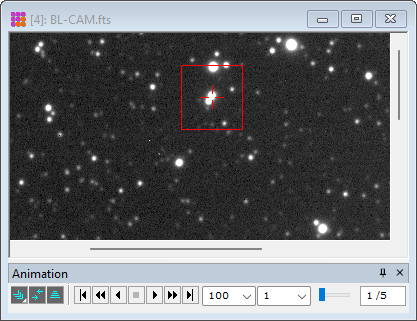
To select the image and cursor coordinates corresponding to plot 2, the Plot Animation Bar was opened and animation mode was selected to show individual plots of the plot series. The result is shown below:
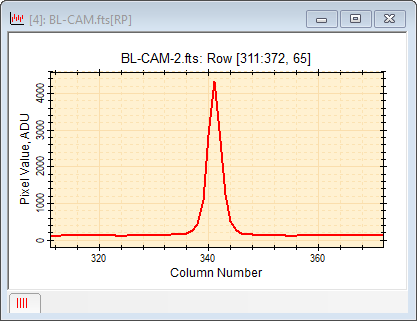
Next, the window containing the image set was buried in the window stack and the plot window returned to the top. Showing a single plot fro the plot series permitted the specific Image Window, image, and cursor coordinates to be determined. In the picture below, not only was the correct image window selected, but the image set was advanced to image 2, corresponding to the red Plot Series 2 in the Plot Series. The cursor coordinates were also updated to the coordinates from which plot 2 was generated. Comparing source image 1, above with source image 2, below, notice that the same image cursor coordinates appear slightly higher on image 2 because the image set is not precisely aligned.

Mira Pro x64 User's Guide, Copyright Ⓒ 2023 Mirametrics, Inc. All
Rights Reserved.