Fixing Header Problems in Photometric Data
This topic describes how to add or change information in the image header that is needed by photometric measurements. There are 3 FITS format keywords required: GAIN, RDNOISE, and EXPTIME. The GAIN keyword reports the gain value in electrons per ADU, the RDNOISE keyword reports the readout noise in units of electrons, and EXPTIME reports the exposure time in units of seconds. If any of these is missing, the magnitude error cannot be calculated correctly. These quantities can be entered into the image header(s) using the FITS Header Editor tool. However, there is an easier way to do this, especially if you will be measuring many images that have the same values of these keywords. Here you will learn how to change the header information using the Info page in the Photometry Properties dialog. If any of these quantities is in the image header but uses a different keyword names, you can change the name used by Mira using the Photometry Keywords dialog, which opens from the Other Photometry Properties dialog..
First, be sure the Photometry Toolbar is visible.
Then click ![]() on the toolbar to open the
Options dialog. Click the Info tab to select the Info
page as shown below.
on the toolbar to open the
Options dialog. Click the Info tab to select the Info
page as shown below.
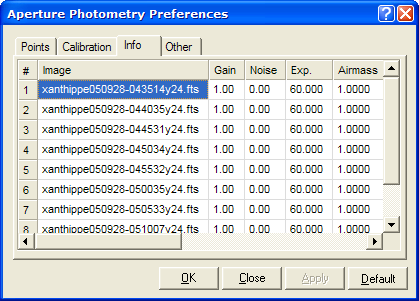
Notice the 3 columns labeled Gain, Noise, and Exp. which correspond to the GAIN, RDNOISE, and EXPTIME keyword values. Only Exp (the EXPTIME keyword) was actually present in the image headers. For the other two, Mira assigned default values so that it could make the calculations. We want to change the values of Gain and Noise.
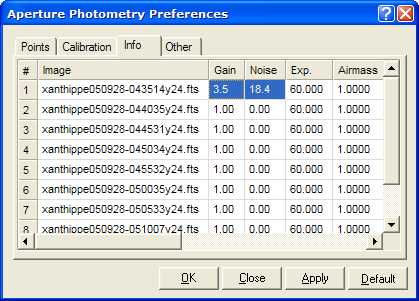
To change a value in the table, click on the cell and enter a new value. When you click elsewhere or otherwise leave the cell, the value is accepted. As shown below, change the values in the two cells for the first image. These are highlighted in blue to show the changes:
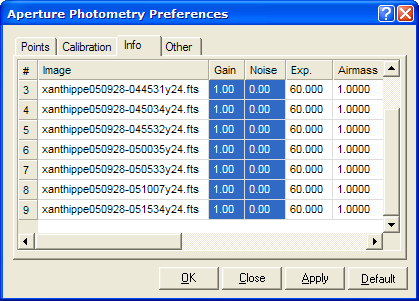
We could repeat this procedure for all the cells we need to change. But there is a faster way to do this if the same values are to be propagated into all images. Mouse-down on the Gain value we just changed in the first row. With the mouse button down, drag the mouse one cell to the right and downward to the bottom of the table. If the scrolling runs away, that is OK; keeping the mouse button down, just move the mouse backward until only the two columns are highlighted for all images. This is shown below with the table automatically scrolled to the bottom. Release the mouse and do not click on the table yet or you will erase the selection area!
Next, right click inside the selected area to open a menu of commands like that shown below. Using the mouse, select the option to Fill down, as shown below. DO NOT select the option to "Fill top row down", else all columns, except for the image name, will be copied from the top row downward to all other images.

You are almost done. The result of fill down produces the table as shown below.

Finally, click [Apply] or [OK] to save the changed data into the image headers. The changes apply to the displayed images but not to the files from which they were loaded. After closing the Properties dialog, you may want to make these changes permanent to the image files by using one of the commands described in Saving Image Sets.
Introduction to Aperture Photometry
Aperture Photometry Properties
Mira Pro x64 User's Guide, Copyright Ⓒ 2023 Mirametrics, Inc. All
Rights Reserved.