Create Flat Frame
The Create Flat Frame method is used by the Calibrate Images command to create one or more master flat field frames from 1 or more raw flat frames residing in files. When creating multiple files using the Filter Keyword, the raw flats are sorted by filter and saved with the filter as a file name suffix. The source files are specified on the Source Files > Flat page. To apply master flat field frames to other images, use the Apply Flat Frame method.
|
Parameters for Creating Master Flat Frames |
|
|
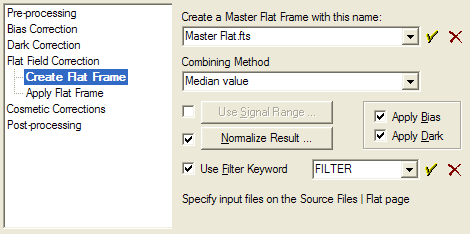
Create a Flat Frame with this Name |
Enter the name of the output master flat field frame. |
|
Combining Method |
Controls the way the flat frames are combined to make a single master flat frame. These methods are described in Image Combining Methods. |
|
Apply Bias |
Check this option to apply a bias correction to images when building the master flat. |
|
Apply Dark |
Check this option to apply a thermal (dark) correction to images when building the master flat. |
|
Use Signal Range |
Check this option to cull improperly exposed images when creating the master flat. Click the button to configure the limiting signal values. |
|
Normalize Result |
Check this option to normalize image when combining into the master flat. Click the button to configure the statistical estimator used for normalizing. The resulting master flat will also be normalized to a signal of 1.0 using the same configuration. |
|
Use Filter Keyword |
Check this option to stratify raw flat field frames into groups based on the value of a filter keyword. Enter the name of the filter keyword into the text field or select it from the history list. Use this keyword to create multiple master flats, one for each value of the Filter Keyword. |
When the Use Signal Range option is checked, Mira culls candidate flats from the list to be merged when the candidate has a signal that is too low or too high. This feature provides protection against merging raw flat frames that are mistakes or that are corrupted or would otherwise reduce the quality of the master flat. Clicking the button opens a dialog where you specify the range values, as shown below:
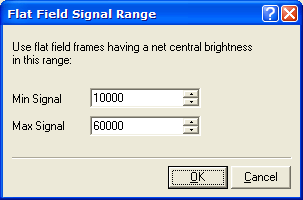
Note that the signal level is measured above the bias and dark signature. In other words, this is the signal measured after the bias and dark are removed, if you are electing to apply the bias and dark corrections to the raw flat frames.