Methods tab (Image Calibration)
The Methods tab describes how to do each of the methods selected on the Procedures page. Each method has a set of references that must be set using this page. Each method of interest is selected from the tree control. When a method is selected, its preferences appear on the right side of the page.
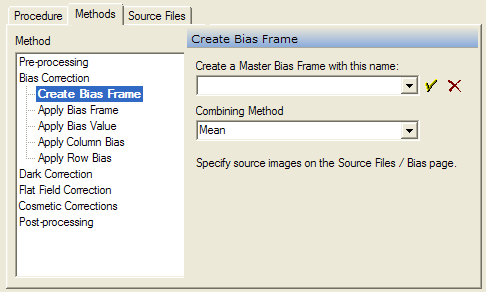
To open this page, execute the Calibrate Images command and select the Methods tab.
Below is shown a typical Method page. In this case, the Create Bias Frame method is selected. To configure the method for use, its preferences must be set as needed. The preferences for all methods are saved and restored by the Profile control on the main Image Calibration dialog. Remember to update changes to the method by clicking the [Apply] button.
The methods in the table below are available in Mira Pro. Some of these methods apply to all image types whereas others apply only to specific image types such as the data frames you are calibrating.
|
Image Calibration Methods |
|
|
Changes the file extension of a list of files. For example, you may want to change the fie names from *.fits to *.fts. |
|
|
Modifies the headers of the images: Add new keywords, Change keywords values, or Rename keywords. For example, you might need to rename the nonstandard keyword "EXPOSURE" to the standard keyword "EXPTIME". |
|
|
Creates a master bias frame using source files described on the Source Files > Bias page. The bias source files are combined using one of the specified methods. |
|
|
Applies a bias frame. The bias may be displayed, in a named file, or the result of the Create Bias Frame method. |
|
|
Applies a bias value. The value may be a number or it may be taken from the header of each Process Image. |
|
|
Applies a Column Bias correction. The correction is taken from either the underscan or overscan columns. |
|
|
Applies a Row Bias correction. The correction is taken from either the underscan or overscan rows. |
|
|
Creates a master dark frame using source files described on the Source Files > Dark page. The dark source files are combined using one of the specified methods. This method can create a single master dark or a library of master darks. |
|
|
Applies a dark frame or a library of master dark frames. The dark may be displayed, in a named file, or selected from among a library of darks using different integration times. The dark(s) can also be taken from the result of the Create Dark Frame method. |
|
|
Creates a master flat frame or a library of master flat frames using source files described on the Source Files > Flat page. The flat source files are combined using one of the specified methods.. |
|
|
Applies a flat frame or a library of flat frames to the data Images. The flat may be displayed, in a named file, or selected from a library of flat field frames using different filters. The flat(s) can also be taken from the result of the Create Flat Frame method. |
|
|
Applies a pixel correction mask loaded from a file. This mask may be the result of the Create Pixel Mask command or created using the Edit Pixel Mask command. |
|
|
Applies a blemish correction mask to repair rows, columns, and point defects. You can create blemish masks using the Edit Blemish Mask command. |
|
|
Applies a cosmic ray filter to the image. This correction replaces pixels that deviate too much from the values of neighboring pixels. |
|
|
Trims the output images to a finished size. This is basically a Cropping command. |
|
|
Changes the final data type of the output image. This applies only to data frames, not to calibration images that are created. This method produces the same effect as the Change Data Type menu command. |
|
|
|
|