Critical Concepts
Mira Pro x64 provides a number of unique features and capabilities for working with images. The topics below have been selected to help you get up to speed quickly with Mira's user interface architecture and enhancements. This section does not describe processing or measurement techniques.
Mira displays data, including images, plots, measurements, and text, in View windows. Mira provides a distinct type of window for each type of data, including Image Windows, Plot Windows, 3-D Plot Windows, Report Windows, a Text Editor, and the Create Image Keyword List. When a view window is the top-most window (i.e., it is on top of all other view windows), it loads a menu of view-specific commands and it accepts mouse clicks and keystrokes (see Accelerator Keys). To make a view window top-most, click on its title bar or select its tab from the tab control along the bottom margin of the Mira screen. Right-clicking on the data inside a View window opens a Context Menu of commands for that window. Data in View windows can also be printed, copied, saved and—with the exception of Plot Windows—edited.
Since the top-most View Window loads its own menu bar and context menu appropriate for that view type, there also exists a Main Context Menu that contains functions that are independent of view type and works no matter what type of view window is top-most. The Main Context Menu is opened by right-clicking on the blank background inside the main Mira window frame.
Dialogs are window in which you have a "conversation" with Mira to enter values, make selections, or set parameters.
Some dialogs add a special [Default] button which is used to apply the changes as default values for all future instances, whereas the normal[Apply] button applies your changes only for the current instance. For example, in the Aperture Photometry Properties dialog, click [Apply] to save your changes to the current photometry instance, but click [Default] to save your changes for all future photometry instances.
Command dialogs usually have these buttons along the bottom: [Process], [Close], and the optional [Apply]. The [Process] button in a dialog is similar to [OK] in a setup dialog, except that it processes the image and may not close the dialog afterward (see the "Close command dialogs" option in the General Properties page). Almost all of these dialogs are opened from the Process menu. The word [Process] is used for two reasons: 1) as a verb to indicate that an action is about to be taken; that you are not merely accepting settings, and 2) to be a uniform button name across commands that do various things. [Close] works like [Cancel] by dismissing the dialog, and [Apply] accepts your changes but does not process the image. Dialogs that open, save, import, or export files use the more obvious [Open], [Save], [Import], or [Export] button in place of [Process].
Some View windows attach Command Toolbars to their borders. Image windows have many different toolbars, including the Image Bar, Animation Bar, and function toolbars like Image Registration, Photometry, and others. These are called "Window Toolbars" because they attach to a window rather than to the border of the Mira Application (see Working with Toolbars)).
The Image Bar, which opens at the top of the window, contains auxiliary views and coordinate readouts for the image plus a number of command buttons. The Image Bar is a very rich tool: It has a number of button commands that operate in the traditional way using a left mouse click, as well as some that use right-click commands (you can tell what a button does by letting the mouse pointer hover over it). You may not always want to use the Image Bar, so it can be shown or hidden using the check box on the Image Properties page. When hidden, most of its commands are duplicated in the menus and in the Image Context Menu. Plots are shown in Plot Windows. They have a Plot Bar that provide button commands for plot adjustment and a coordinate readout. Plot Windows also have a Plot Animation Bar that appears when the window holds more than 1 plot series.
Mira can copy and paste images and plots between windows using the standard Windows clipboard commands. For images, use Copy (Ctrl+C) and Paste (Ctrl+V). For plots, use the similar Copy (Ctrl+C) and Paste (Ctrl+V) commands. Simply make the source and destination windows top-most before doing the copy or paste actions. These commands make it easy to compare images processed in different windows or plots generated using different configurations. For example this makes it easy to make a single plot window showing both a series or rows and the median of those rows (plot all rows in one window, plot a median slice in another window, then copy and paste). Plot Properties also can be changed afterwards, for example, to distinguish the data plotted from the separate image windows.
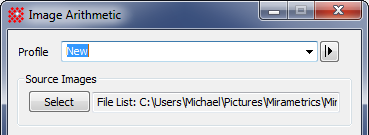
Mira global command dialogs use a series of common controls at the top, including aProfile Control and Source Image Selection control. as shown below.
In addition, most Mira dialogs can be resized if resizing is relevant. A resizeable dialog shows a small "gripper" surface in its lower right corner. A resizeable dialog may be resized by dragging from an edge or corner.
Mira installs its files in several "special" folders which you may need to access. These files also include the sample images provided with the software. See the topic Mira's Special Folders. If you are an administrator of a machine on which other users will be using Mira, be sure to read that topic.
Mira can display 1 or more images in a single Image Window. This stack of images is called an Image Set. An Image Window can hold an image set of any size up to the limits of your computer's memory. In fact, Mira's unique Image Set architecture is woven throughout the program, making it both easy and efficient to apply commands and measurements to only a single image or to all the images in the set. The choices to process, measure, or graph one image or the entire image set are held as 3 state Image Set Flags. These choices can be changed for a particular Image Window using the View > Image Set menu or the Image Set buttons on the Image Bar. The default values can be set on the General Properties page.
To display an image set, you simply open more than one image into the same window. You can save the whole set using various commands. You can also add 1 or more images to a single image or an image set using the append, insert, delete, and swap commands in the Image Set Toolbar (these commands are also available from menus). When an Image Window contains an image set of 2 or more images, it automatically opens the Animation Bar for blinking and animating the stack of images.
A File List is a text file that contains the path and file name of 1 or more other files. Using a File List makes it easy to organize groups of files either separately or as Image Sets. A File List is treated like other files containing images, text, etc. It can be opened from the Open command or saved from a displayed image set. A File List can be edited and it can even contain other File Lists or a mixture of files of various types mixed with other File Lists. A File List is easily created by marking files in the Open dialog or by saving an Image Set as a File List, or by using a text editor. File lists have the file type "axf".
The Image Cursor is a dedicated rectangle or crosshair marker that retains its position and size on the image independent of the mouse pointer. The image cursor is used for measurements, plotting, and "region of interest" operations such as cropping. It has 4 shapes: Rectangle, Crosshair, Lines, and Hide; all modes except Hide track the coordinate of its center and the coordinates of its maximum extent on the image. These coordinates are used for computing centroid positions, region statistics, and for defining columns and rows to be plotted. By coupling together the normally separate actions of positioning, measuring, and plotting, Mira offers some unique and valuable capabilities that are not possible otherwise.
The Image Cursor can be resized and moved when the image window is in Cursor Mode. It can also be moved without using cursor mode by pressing the Ctrl+A key. In a zoomed image, the image cursor can be finely positioned to Subpixel precision using either mouse movements or the arrow keys (provided the image window is top-most so that it has the keyboard focus).
An image is an organized collection of data consisting of values at locations called pixels (meaning "picture elements"). Mira Pro opens only 2-D images, although it can create 1-D and 3-D plots of 2-D images. In a 2-D image, the variation in pixel values across the image may represent a picture or the result of a mathematical calculation or a numerical model of a physical process. A pixel can have a value like the following: 1000, 600.54, or 255,128,14. The mathematical description of the pixel value is its Pixel Type. The pixel type controls the quality of the image by setting limits on its dynamic range, signal to noise ratio, and whether fractional values (e.g., 600.54) may be expressed. The pixel type can also affect the quality of a processed image or the precision of a measurement. The pixel type of an image can be changed automatically or by your request during a processing command or you can change it manually (see the Change Pixel Type command).
Mira works with images having a wide range of pixel type, including integer or real number values and color values. In particular, Mira can open, process, measure, analyze, and save images having 8, 16, or 32-bit integer pixels, 32 or 64-bit real pixels, and 24-bit color pixels. Both signed and unsigned 16-bit pixels are supported. The pixels of a 24-bit color image store shades of color rather than numerical values. Image that have a numerical pixel type are often called "intensity" images since their pixels measure a physical quantity rather than a color shade.
To display an image, Mira creates a bitmap showing a visual representation in Grayscale, color, or pseudocolor (i.e., false colors assigned to an intensity image). In displaying an image, its pixel values are not changed, but they are used in several mathematical algorithms to create the bitmap. Any time you interrogate the pixel values, make a measurement, or perform any processing, Mira works with the pixel data. However, the screen bitmap is independent and it may be adjusted to allow you to better visualize the pixel data.

Creating and adjusting the screen bitmap is a two step process. To display an image, Mira first slices a range of image intensity into 256 discrete levels using a mathematical rule known as a Transfer Function. The primary purpose of the transfer function is to determine the minimum and maximum pixel values that will be displayed, called Zmin and Zmax. Any pixels outside this range are displayed as pure black or pure white and can show no detail. The secondary purpose of the transfer function is to assign the 256 levels between Zmin and Zmax. The levels can be equally spaced or crowded together at one end of the brightness range to emphasize details involving a particular range of brightness. The second step of displaying an image involves assigning a table of colors (a "Color Map") to each of the 256 levels using a Palette. If the palette has 256 shades of gray, then the image is displayed in Grayscale, like a black & white photograph. However, the palette can use any color for a given level, not just gray, to make a pseudocolor (= false color) display. Pseudocolor is a powerful tool for emphasizing and detecting particular image features that span only a certain range of intensity. Adjusting the transfer function and palette independently during and after image display give you extensive control over how image details are rendered. After an image is displayed, you can make changes using the Transfer Function Pane and Palette Properties dialogs. You can also interactively change the palette using mouse movements; see Adjusting the Palette and The Palette Graph. In general, if you are going to make a large change to the transfer function of an image, it is best to first reset the palette (for example, double right-click on the "Color Map").
Mira is installed with several fundamental palettes such as "Grayscale" and others. However, a rich collection of pseudocolor palettes is provided with the sample files. These are installed in the Palettes sub folder of the Sample Images folder (see Mira's Special Folders). The extra palettes may be imported using the View > Palette > Import Palettes command in the main menu for Image Windows.
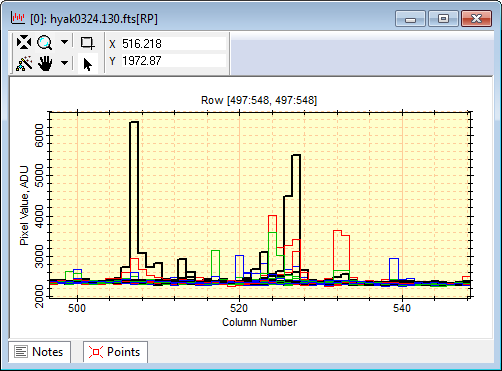
A Plot Window can hold multiple graphs at the same time in much the same way an Image Window holds multiple images as an Image Set. Each of the graphs in this "plot set" is called a Plot Series. Plot series are used when plotting the intensity profile over a range of columns or rows and for Over-plotting multiple line profiles made along parallel lines. For example, if you plot a row profile for an image set of 5 images, then the Plot Window will contain 5 plot series. If you plot a range of rows and the Image Cursor is 46 pixels tall, then the Plot Window will contain 46 plot series. When the Plot Window contains multiple series and it is in Animate Mode, it uses the Plot Animation Bar for selecting and animating the series. The Plot Window can also be switched to Overplot Mode which displays all series at one time on the same set of axes. For details about plot modes, see Tutorial: Creating Plots from Images, Column Profile Plot, and Row Profile Plot (Tip: In Animate Mode, you can also step through the plot series using the [Tab] key when the Plot Window has focus, even if the Plot Animation Bar is hidden). The window below shows a plot series in Overlay mode where all series are visible at one time.
Mira displays, measures, and plots data using both pixel coordinates (i.e., columns and rows) and world coordinates. The first pixel of an image is defined as (column,row) = (1,1). However, positions can be measured much more precisely than this. Coordinates inside a pixel are defined as in the FITS data format: a pixel extends from -0.5 to +0.5 relative to its integral (i.e., whole number) coordinate. For example, pixel (1,1) extends over the coordinate range (0.5:1.5, 0.5:1.5), as written in the form (column1:column2, row1:row2). This notation is used throughout this document. A 2-D image having m columns and n rows therefore has integral pixel coordinates in the range (1:m, 1:n), and its data extend from 0.5 pixels before that to 0.5 pixels after that, over the range (0.5:m+0.5, 0.5:n+0.5).
![]()
World coordinates relate image positions to an external coordinate system such as Right Ascension and Declination, microns, or kilometers. This feature uses the FITS World Coordinate System ("WCS") extension to the FITS data format. The mathematics used by the WCS allows measurements and plots to use meaningful units of measure rather than just column, row, or pixel number. In addition, the measurement of angles and areas are controlled by the coordinate system and the image format. If the image is opened from a FITS image having a WCS calibration, then world coordinates are automatically available (Mira either shows both or allows you to choose). As you roam the crosshair over a displayed image you will see precise Subpixel coordinates displayed on the Image Bar. Pixel coordinates are indicated by C and R, for Column and Row. World coordinates, which may have any units from one image to the next, are indicated by X and Y. The position (X,Y) is the world coordinate of pixel position (C,R). If the image does not have a WCS calibration, then X = C and Y = R.
Once displayed, you can create or change the WCS of an image—even a color image, which is not directly supported by FITS format. The Image Window > Coordinates menu contains several commands for working with world coordinate systems. For example, Mira can create an arcsecond scale as a world coordinate system. Mira preserves and updates the WCS through geometric processing such as cropping and image rotation. If an image having a WCS calibration is saved to FITS format, then the calibration saves with it. Unfortunately, other image formats do not provide support for a world coordinate system. Thus if you create a WCS calibration for a color image, or one opened from TIFF, JPG, or BMP format, then you can save the calibration if you first convert the color image to an intensity image (e.g., 16-bit) and save the intensity image in FITS format. See Image Coordinate Systems and Plot Coordinate Systems for more information.
The Profile Control is a single control that manages the properties of a command by saving groups of properties under a name. Selecting the name makes it easy to recall a set of properties waved in the past. For example, the Combine Image Set command has a large number of properties that vary for several specific applications. The Profile Control allows you to save many such sets of properties so you don't have to recall them each time. As a security feature, an existing profile may be "locked" so you have to take an extra step to unlock it before you can change, delete, or save over its settings.

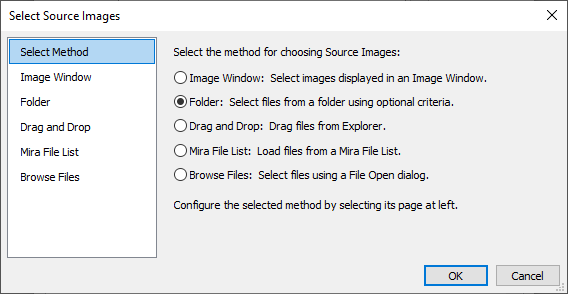
Source images are the images that are opened or processed by Mira. In the simplest sense, opening an image file for display opens a source image, as that image is the source of what is displayed. Most Mira commands can open their source images from both displayed images and images in files. Open from files saves the time and memory use of displaying the images. The Select Source Images topic discusses several ways that command dialogs can load source images. Most commands provide source image selection using a standard tool. This is a very powerful feature of Mira.
Mira Pro x64 User's Guide, Copyright Ⓒ 2023 Mirametrics, Inc. All
Rights Reserved.