Tutorial: Displaying an Image Set
This tutorial extends the concepts learned in Tutorial: Displaying an Image. Here you will learn how to open multiple images to work them as an Image Set, animate them like a movie, make some measurements, and save the files.
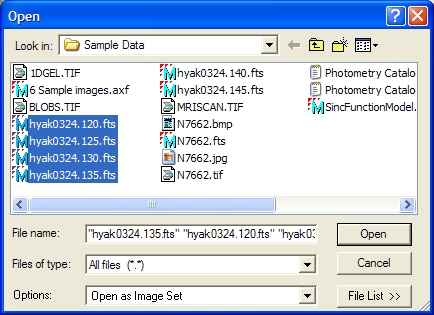
Click File > Open... to show the familiar Open dialog shown below. Select the 4 images as shown below and click [Open].
Note: Marking these 4 files involves the standard Windows multi-selection protocol using the [Shift] key. To mark files that are not in a contiguous block, use the [Ctrl] and [Shift] keys in the normal way.
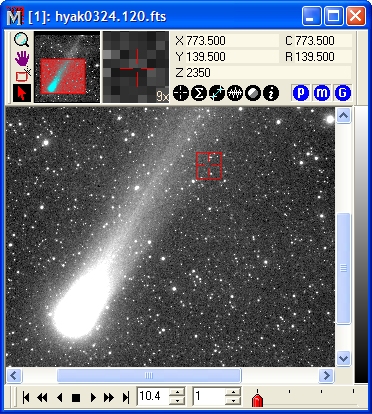
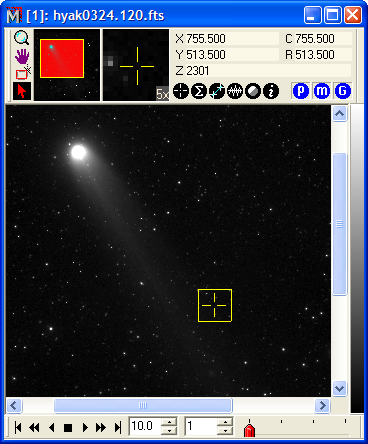
At the bottom of the dialog, notice that Open as Image Set option is enabled (drop the list box to see it as a check box option). This instructs Mira to load the selected images into the same Image Window. Multiple images constitute an Image Set, which is a Mira concept for working with multiple images as one object. If the Load As Image Set item is not checked, then the selected files are opened "traditionally" into different windows. Since an Image Set is chosen, the Image Window opens with an Animation Toolbar along its bottom border. This toolbar lets you select the active image (that is, the one on top) or to move between them. You can switch between images one at a time or by playing them as a movie using a chosen frame rate and step.
|
NOTE |
If a FITS format image opens upside down, open the Open dialog and check the Flip FITS Images option, then re-open the image. |
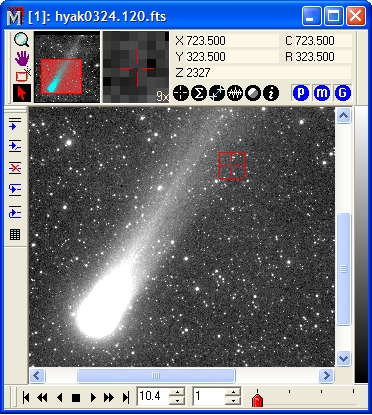
Mira provides tools for adding, deleting, and reordering the image set. These are most conveniently accessed using the Image Set Toolbar, which can be quickly opened or closed using a keyboard accelerator or a menu command. Now, press the key combination Ctrl+Q to open the Image Set Toolbar. The toolbar opens attached to the left border of the current Image Window as shown below.
Using the toolbar is simple and some of its
commands work in conjunction with the Image Animation Toolbar
at the bottom of the Image Window. For example, to insert one or
more images into the image set before the second image, move the
selection trackbar on the Animation Toolbar to position 2, then
click ![]() (insert before) on the
Image Set Toolbar. To delete an image from the set, position the
trackbar pointer and click
(insert before) on the
Image Set Toolbar. To delete an image from the set, position the
trackbar pointer and click ![]() (delete). When you are not using the Image Set Toolbar, you may
wish to press Ctrl+Q again to close
it.
(delete). When you are not using the Image Set Toolbar, you may
wish to press Ctrl+Q again to close
it.
One additional way to insert images into an image window is by using the Copy+Paste commands in the Edit menu. The Copy command places a copy of the current visible image from any image window onto the Windows clipboard. This clipboard image can be pasted into any other image window to append the image set already there.
On the Animation Toolbar, click ![]() ("Fast Forward") to animate the images in the
forward direction through the Image Set. If the toolbar appears as
above, then the frames will be stepping forward at 8.5 frames per
second at a step of 1 (in other words, every frame is shown). Now
move the mouse pointer onto the Colormap at the right side of the
window, do mouse down, and adjust the palette contrast and
brightness while the images are animating ( you can also open the
Palette
Properties dialog and change the palette or palette settings
while animation is running). You can also do things like re-center
and magnify
the images during animation. And, of course, the coordinates
continue to update as you roam the pointer over the image. Next.
let us slow the animation rate to 4 frames per second. To do this,
press and hold the down arrow on the frame rate spin control. You
will see the frame rate reduce and the image animation will also
slow. Now stop the animation by clicking
("Fast Forward") to animate the images in the
forward direction through the Image Set. If the toolbar appears as
above, then the frames will be stepping forward at 8.5 frames per
second at a step of 1 (in other words, every frame is shown). Now
move the mouse pointer onto the Colormap at the right side of the
window, do mouse down, and adjust the palette contrast and
brightness while the images are animating ( you can also open the
Palette
Properties dialog and change the palette or palette settings
while animation is running). You can also do things like re-center
and magnify
the images during animation. And, of course, the coordinates
continue to update as you roam the pointer over the image. Next.
let us slow the animation rate to 4 frames per second. To do this,
press and hold the down arrow on the frame rate spin control. You
will see the frame rate reduce and the image animation will also
slow. Now stop the animation by clicking ![]() on the animation toolbar. Let's step forward
through the images by clicking the
on the animation toolbar. Let's step forward
through the images by clicking the ![]() button.
As you do this, new images move to the top of the stack where they
become the "active image" for the image set loaded into the window.
The same result can be achieved by moving the red trackbar on the
right side of the toolbar.
button.
As you do this, new images move to the top of the stack where they
become the "active image" for the image set loaded into the window.
The same result can be achieved by moving the red trackbar on the
right side of the toolbar.
Now that we have opened an image set, let's see how we can easily work with this same image set in the future. Click File > Open to go back to the Open dialog. If we had any plans to use this same set of image in the future, here is what we should have done in the first place: Create a File List containing the target images. The File List contains the full path name of selected files. Mira works with a File List just a like a file, except that it knows that the File List contains the names of other files. In fact, a file list can contain other file lists, even mixed with individual image names.
Let us create a File List containing 4 image files. First, open the standard Open dialog and click on the 4 images to open, like this (Use the standard Windows [Shift] and [Ctrl] key combinations to mark multiple files):
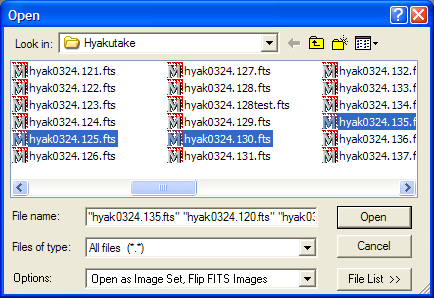
After marking the target images, click [File List >>] on the bottom of the dialog. This opens the File List Editor as shown below.
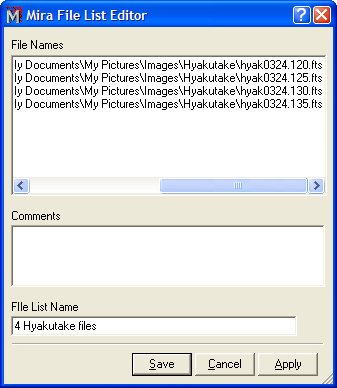
I the above figure the path names are scrolled to the right to show the file name on the right end. As you can see, the Comments and File List Name fields are initially blank. To create a File List, you must enter a name into the File List Name field and optionally, you can add some comments to the Comments field. When you are finished, click [OK] to save the new File List and return to the Open dialog. In the Open dialog, there is a new file with the name you gave to the File List. Here we have named it 4 Hyakutake files; when you click [OK], Mira creates a file named '4 Hyakutake files.axf'. After a short time, the new file name automatically appears in the Open dialog, as shown below. In the future, you will be able to open these same 4 images simply by selecting the File List by name. Let's try that now: Click on the new file list to select it as shown below.
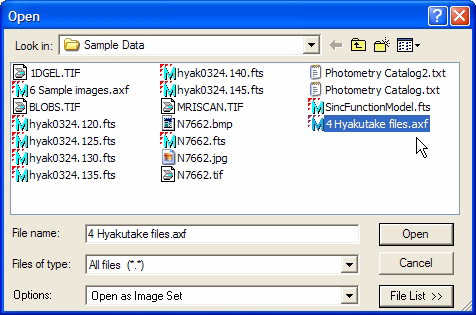
Now, click the [Open] button. The next figure shows the result of opening the file list:
There are more things you can do with a File List, such as opening two of them into the same window. See Working with File Lists.
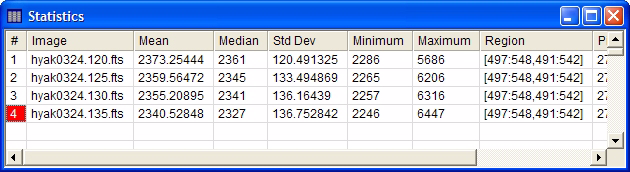
Now let us measure the statistics in the same
rectangular region of interest on the 4 images that we just loaded.
To do this, make sure the Image Window containing the 4 images has
the focus (in other words, it is on top of the stack). On the Image
Toolbar, there are two buttons to use. First, check that ![]() is pressed (blue color). If pressed,
Mira measures the entire image set; conversely, if the button is
popped out (gray), then only the current, top image is measured.
Next click
is pressed (blue color). If pressed,
Mira measures the entire image set; conversely, if the button is
popped out (gray), then only the current, top image is measured.
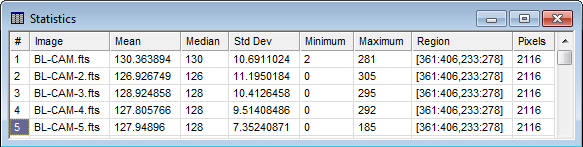
Next click ![]() to perform the measurement. The
Statistics
Measurements are tabulated in the Statistics Report
window shown as below.
to perform the measurement. The
Statistics
Measurements are tabulated in the Statistics Report
window shown as below.
Conversely, if the measure button is popped out,
like ![]() , then Mira measures only
the current image. If you were to move the image cursor to 4 places
on the image, and click
, then Mira measures only
the current image. If you were to move the image cursor to 4 places
on the image, and click ![]() each time, you
would instead create a report of measurements for only the top
image, hyak0324.125.fts:
each time, you
would instead create a report of measurements for only the top
image, hyak0324.125.fts:
Of course, the region being measured may be changed
by adjusting the Image
Cursor and then re-measuring. Additional statistics
measurements are written to this same window. You can also measure
only 1 image by popping out the ![]() so that it appears black. You can
determine the current state of this Image Set Flag by letting the mouse pointer
hover over the button. The
so that it appears black. You can
determine the current state of this Image Set Flag by letting the mouse pointer
hover over the button. The ![]() button
is similar except that it controls processing rather than measuring
and plotting.
button
is similar except that it controls processing rather than measuring
and plotting.
One of the many types of plots Mira can display is
a Row Profile Plot, which shows the variation in image luminance
along a row. The Column Profile Plot shows the variation along a
column. For Column Profile Plots and Row Profile Plots, and
for some other plots and measurements, the region of interest is
marked using the Image
Cursor. Before making the plot, we must answer the following
question: Do we want to plot the average row profile for a single
image or do we want to plot the same row profile for the entire
image set? The choice is made using the Image
Set Plot button ![]() on the
Image Toolbar.
Click the
on the
Image Toolbar.
Click the ![]() button to pop it
out and turn off image set plotting. That way, only the current
image will be plotted. Click
button to pop it
out and turn off image set plotting. That way, only the current
image will be plotted. Click ![]() on
theImage Toolbar
(or
on
theImage Toolbar
(or ![]() on the main toolbar) to
plot a single row at the center of the Image Cursor. This button
executes the Row
Profile Plot command. If instead, you clicked
on the main toolbar) to
plot a single row at the center of the Image Cursor. This button
executes the Row
Profile Plot command. If instead, you clicked ![]() to make it appear pressed, then you
would get 4 plot series, one at the same position in each member of
the image set, as shown below. Notice in the plot caption (not the
window caption) that [497:548, 516]
reminds us that we plotted between columns 497 and 548, along row
516. This plot shows only row 516 for all members of the
image set.
to make it appear pressed, then you
would get 4 plot series, one at the same position in each member of
the image set, as shown below. Notice in the plot caption (not the
window caption) that [497:548, 516]
reminds us that we plotted between columns 497 and 548, along row
516. This plot shows only row 516 for all members of the
image set.
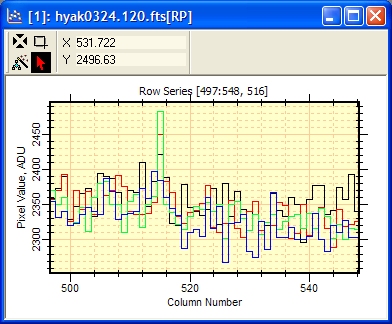
In the window above, each plot series uses a different color. You can choose these colors or set them all to the same color using the Plot Attributes dialog. You can also animate the plot series much as you would the Image Set using the Plot Animation Toolbar. Notice that the window title has the suffix [RP], which means "Row Profile".
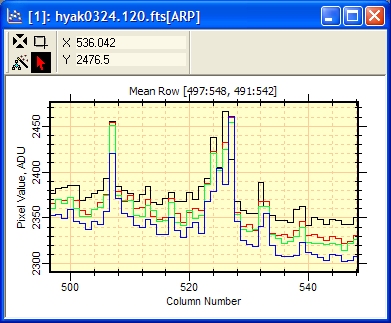
Another interesting plot might be the Average Row Profile,
which plots the mathematical average of all rows inside the Image
Cursor. To choose the active image or all images, we again set the
![]() button accordingly. The figure
below shows the Average Row Profile ([ARP]) inside the same Image
Cursor region.
button accordingly. The figure
below shows the Average Row Profile ([ARP]) inside the same Image
Cursor region.
Finally, lets suppose we performed some processing on the image set images and we will save the images back to files. We can save to the original files or to other files. The alternatives are described in Saving Image Sets. Here will will save the image set over the original files: Click File > Save Image Set > Save All. Using other commands in the Save Image Set submenu, we can save all images to a different folder, append a suffix to the file names, or create a new File List.
Contents, Tutorials, Getting Started, Tutorial: Displaying an Image